Anti-rotation bracket -01

Anti-rotationSaffa bracketanti-rotaziobne - 01

AssembleAssemblare theil Motormotore ande thela Anti-rotationstaffa Bracketanti-rotazione (-01)
---
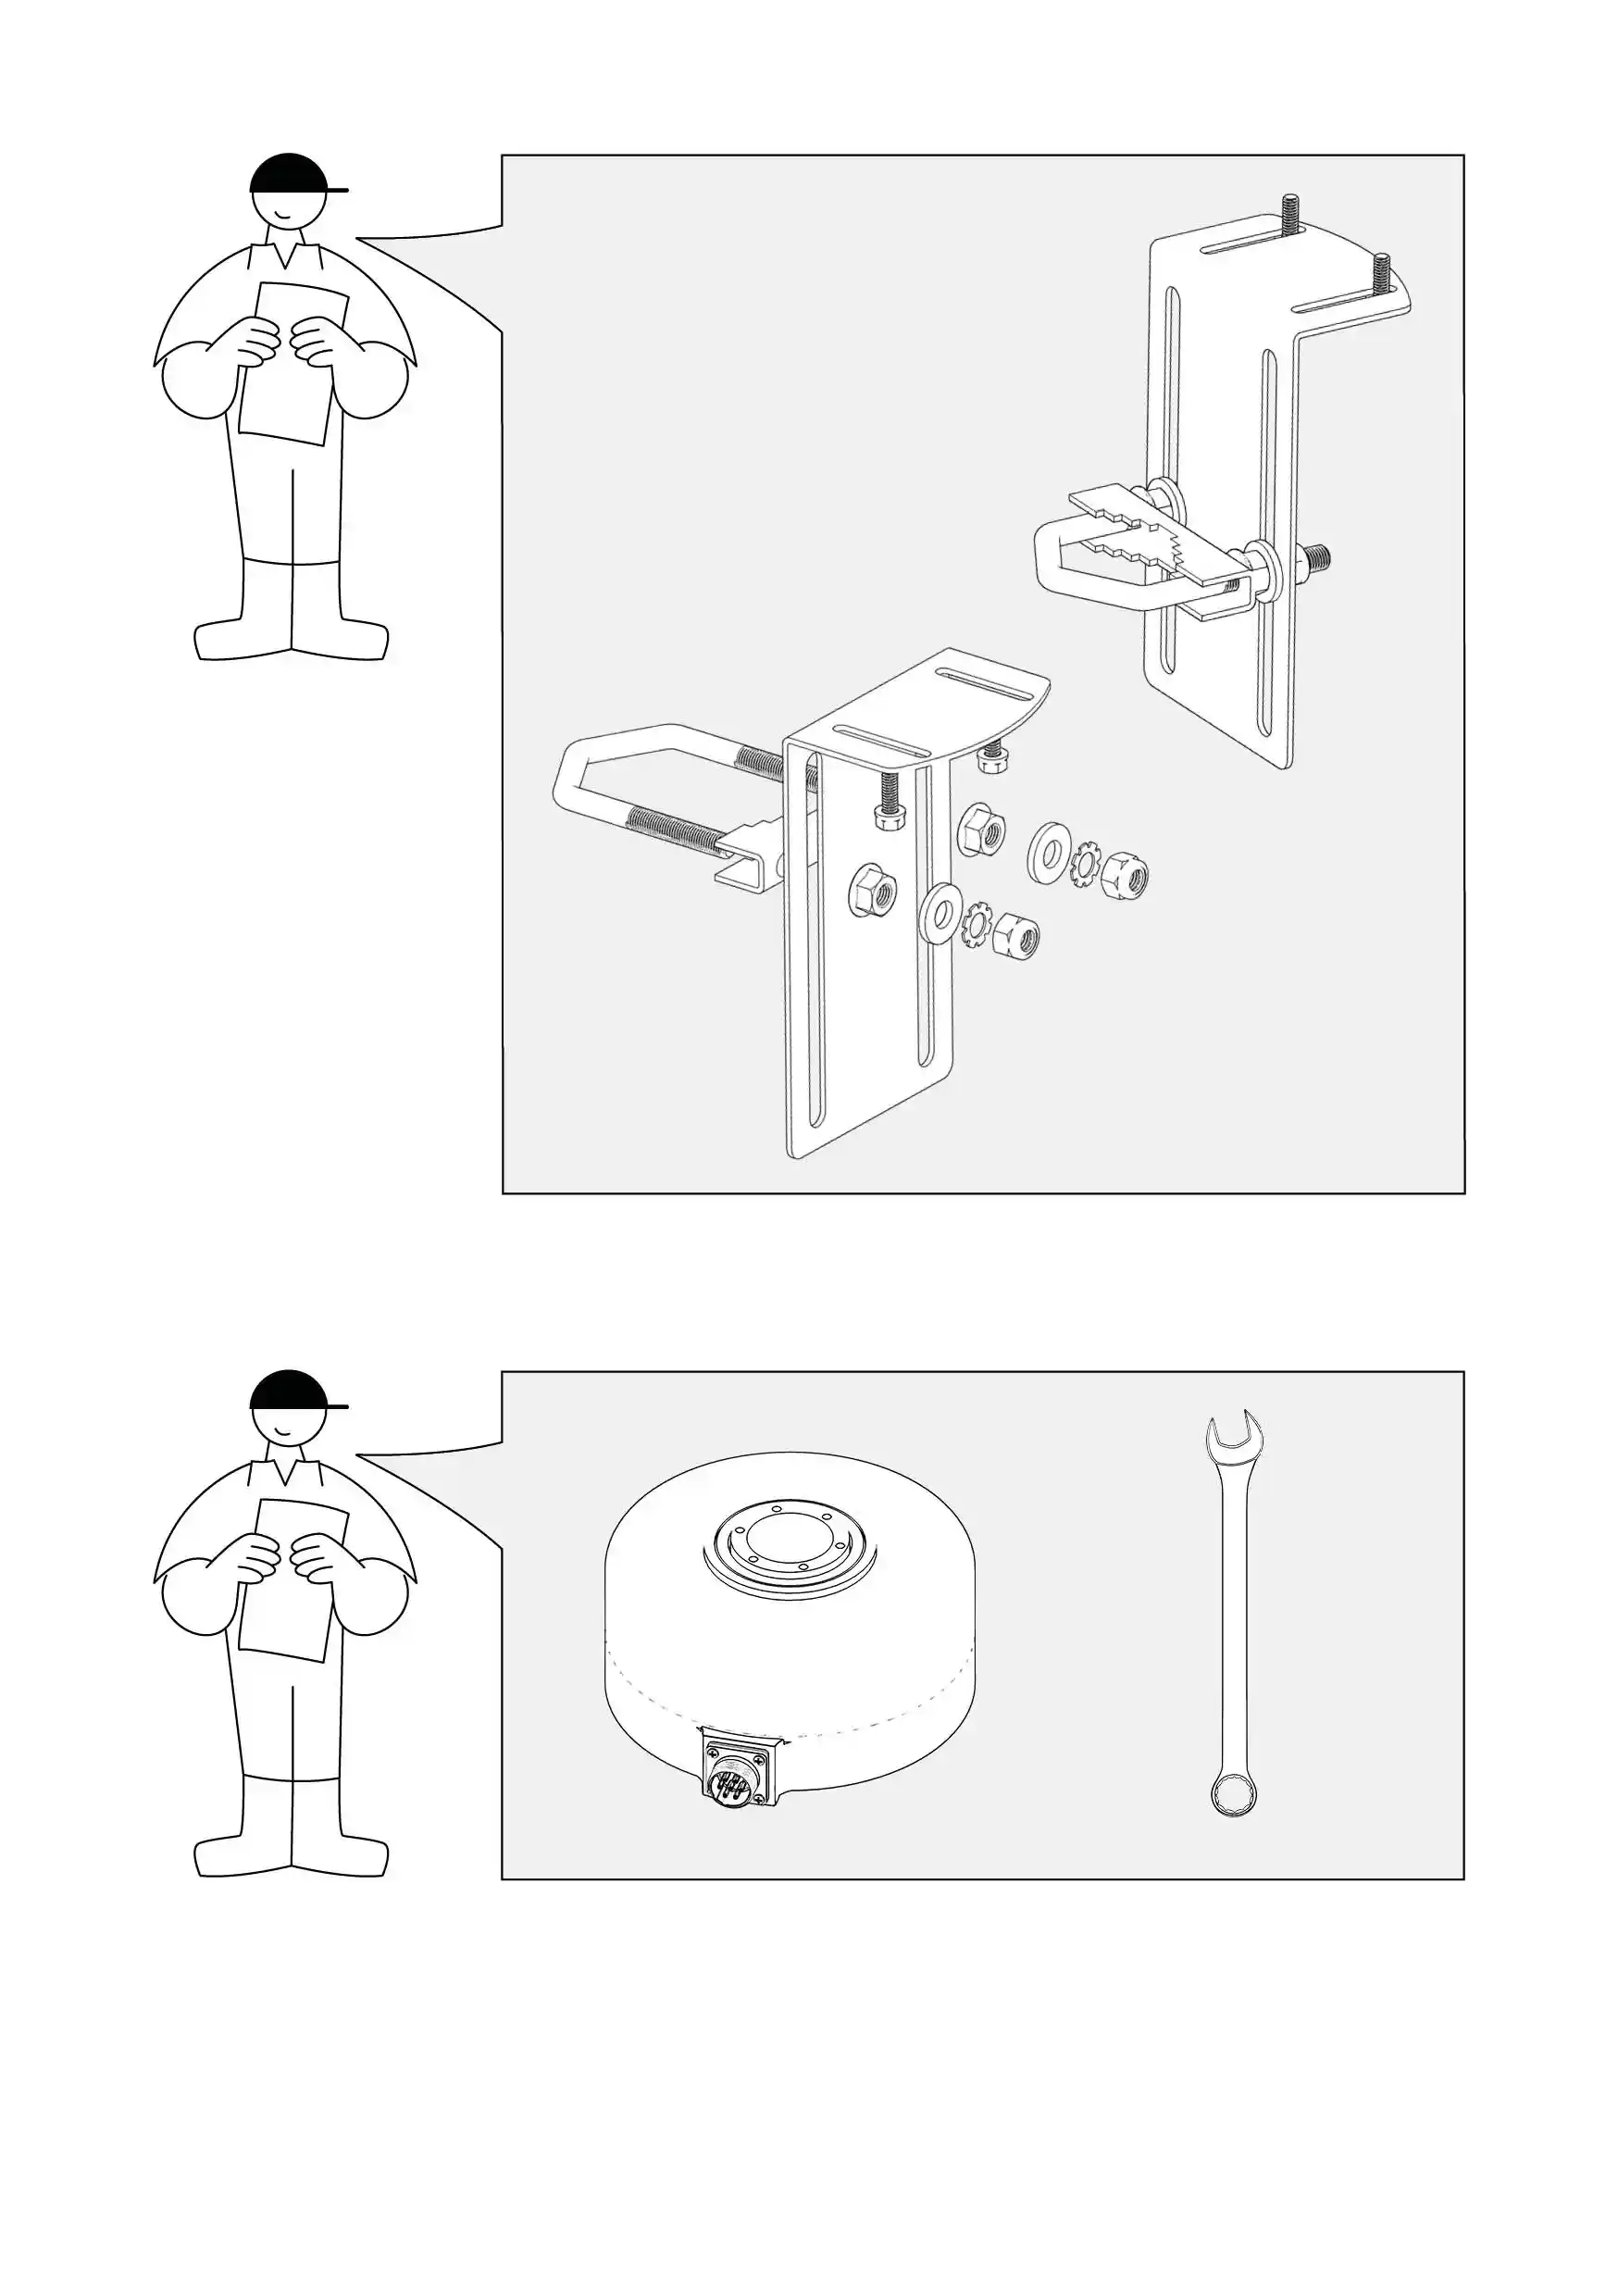
InNella the package:
confezione:
  • 1 pipemorsetto clamp
    per tubi
  • 1 L-shapeangolare metala corner
    L di metallo 
  • 2 hexdadi nutsesagonali M8 (forper open-endchiave wrenchda size13 13mm)
    mm) 
  • 2 plainrondelle washers
    piane
  • 2 toothedrondelle lock washers
    dentate
  • 2 hexdadi nutsesagonali withcon extendedbordi edges
    allargati
  • 2 screwsviti M5 withcon plainrondelle washerspiane ande springrondelle lock washerselastiche (forper open-endchiave wrenchda 8mm)
    8 mm) 
  • C-shapedAnello metal pipe withmetallico a thread
    forma di C filettato 
  • MetalStabilizzatore stabilizer
    metallico
  • TheIl Motor
    Motore
RequiredStrumenti tools
necessari
  • Open-endChiave wrench sizeaperta 13 mm
  • OpenDimensione wrenchdella sizechiave aperta 8 mm


InformationInformazioni
InNel thecaso casedella ofstaffa the Anti-rotation bracketanti-rotazione -01 thele stepsfasi ofdi assemblingassemblaggio thedell'attrezzatura equipmente anddi mountingmontaggio itall'albero todello thesterzo steeringsono shaftstate havetrattate been covered together.insieme.

PowerSteer_manual_25.10_eng51 (1).webp

Anti-rotationStaffa bracketanti-rotazione -01

HowCome to mount it?montare?
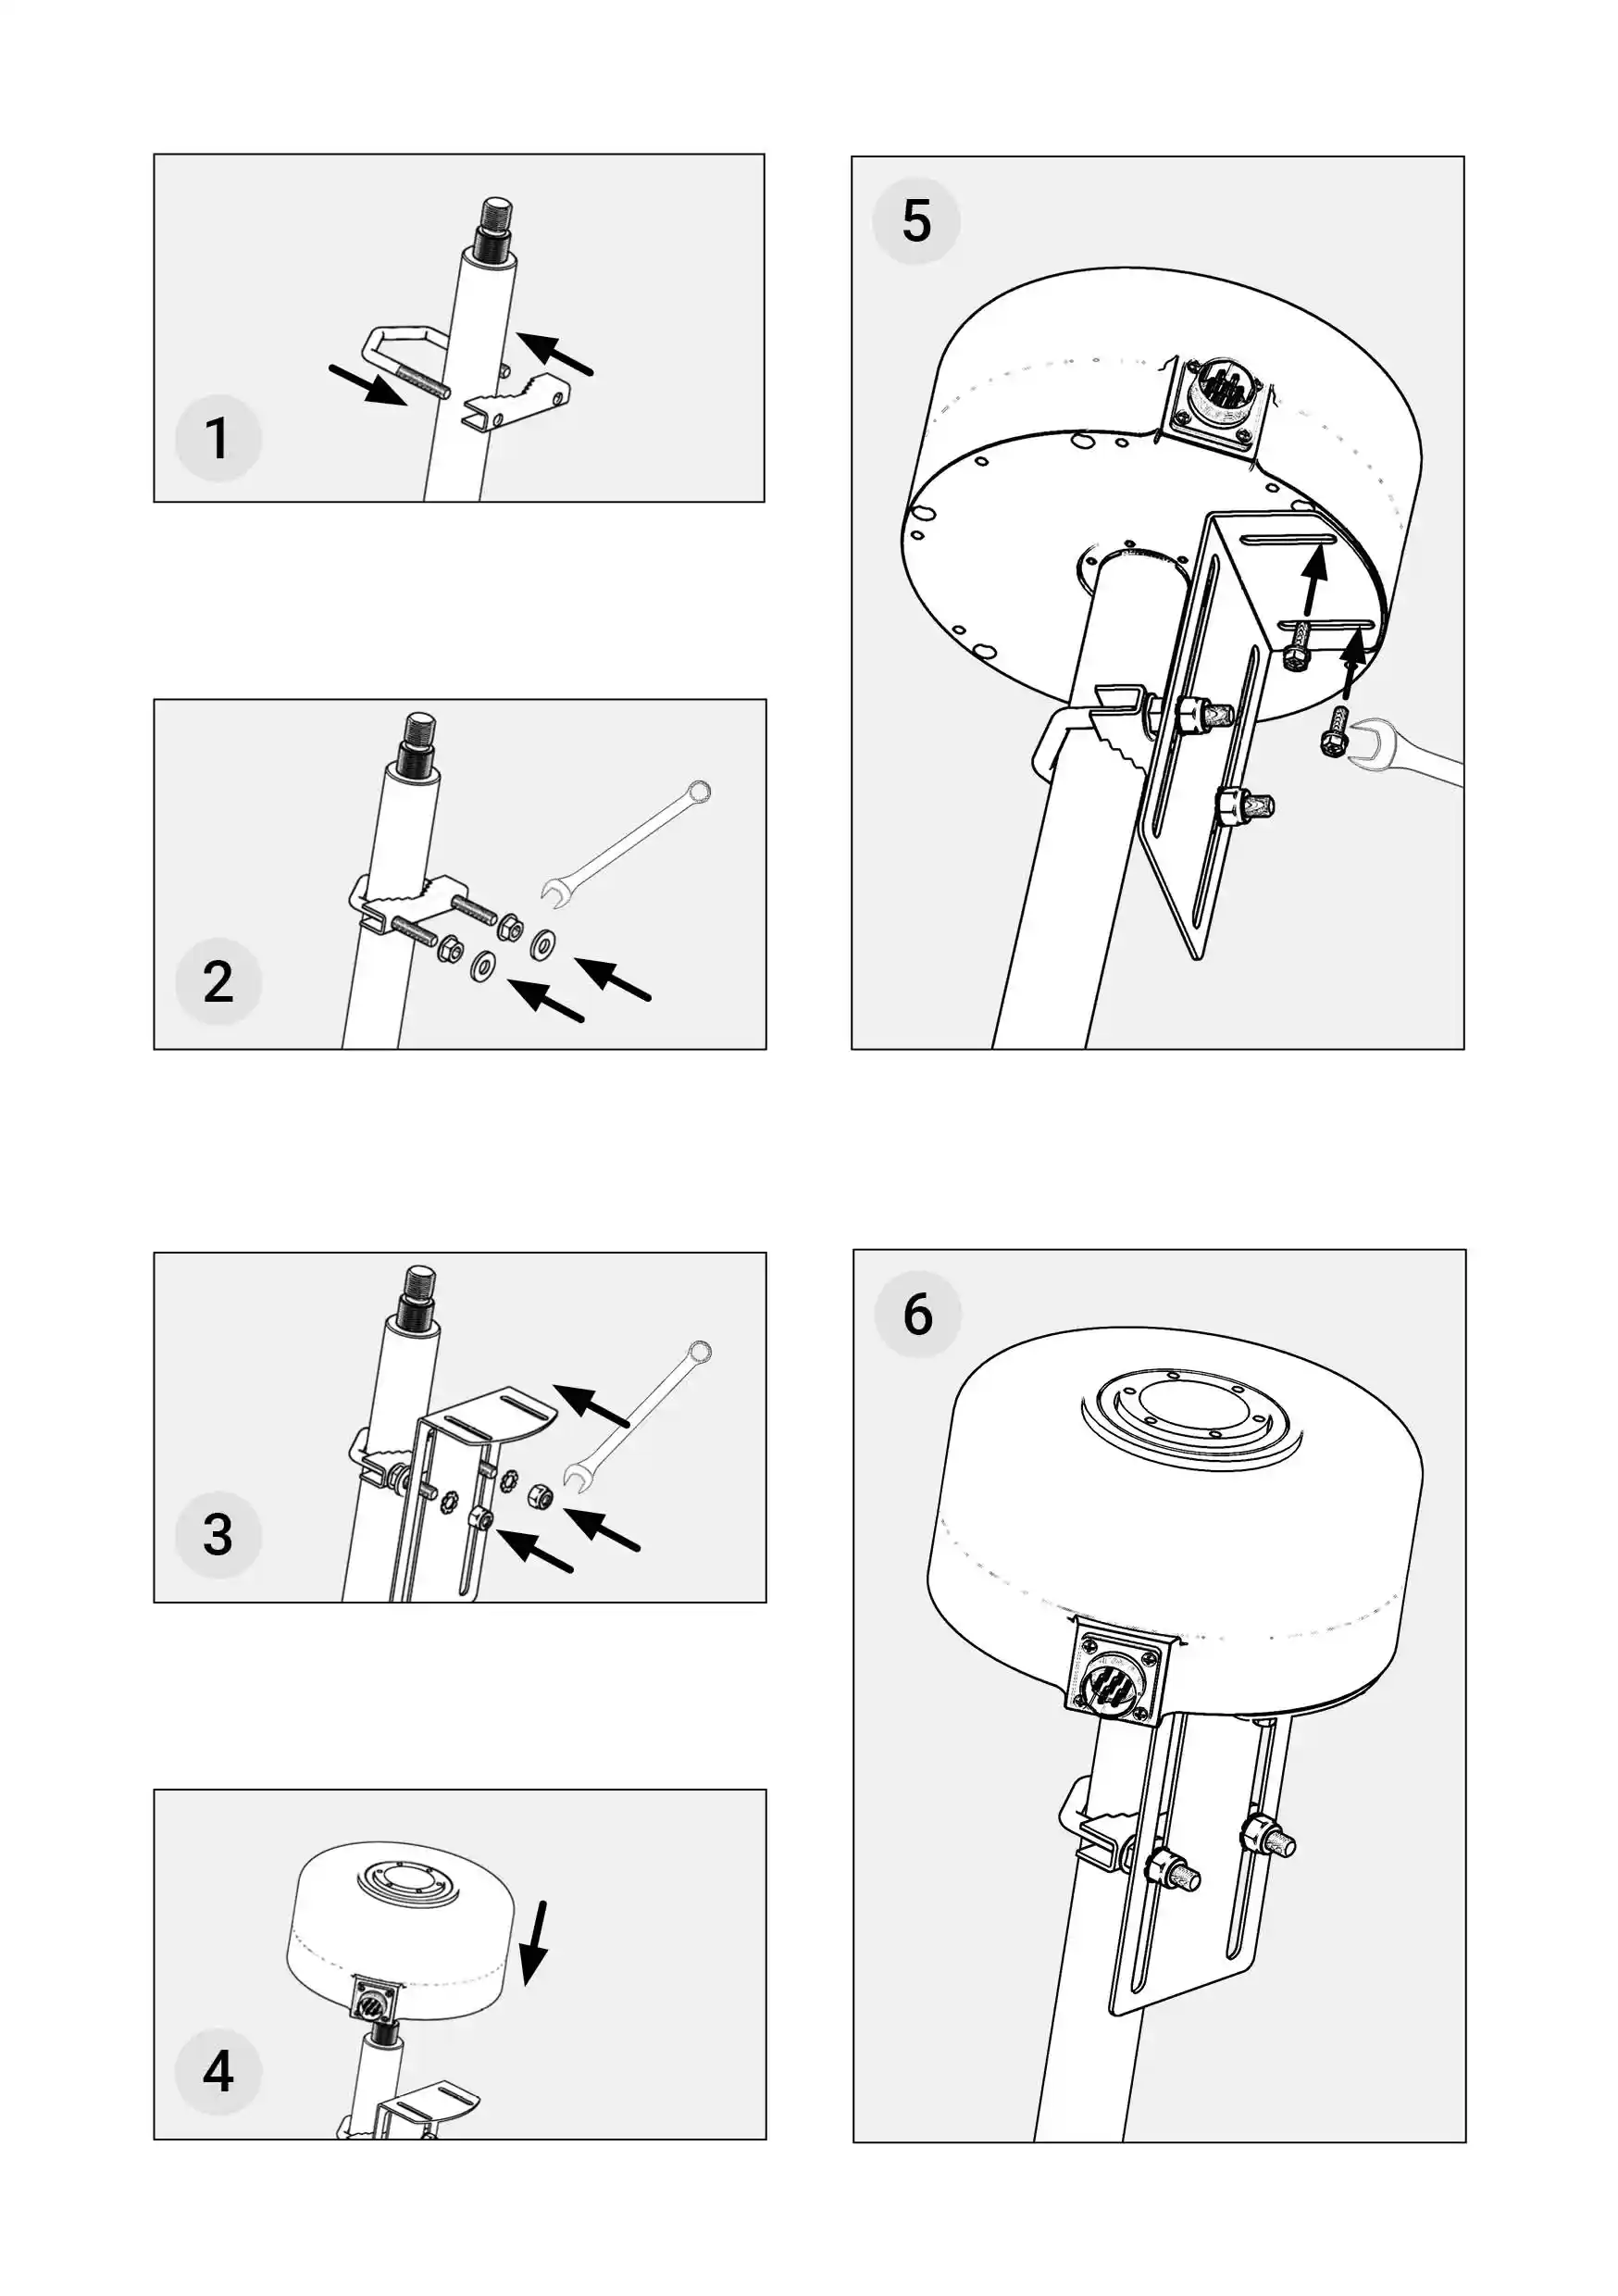
  1. TakePrendere theil C-shapedtubo metal pipe withmetallico a threadforma anddi shovelC itcon onuna thefilettatura steeringe shaftspalarlo rodsull'asta arounddell'albero dello sterzo circa 5 centimeterscentimetri belowsotto thel'estremità enddell'albero ofdello the steering shaft.sterzo.
  2. PlacePosizionare thelo metalstabilizzatore stabilizermetallico onsulle thedue twoestremità endsdel oftubo the C-shaped metal pipe withmetallico a thread.forma di C con una filettatura.

  3. PlacePosizionare thei 2 hexdadi nutsesagonali withcon extendedbordi edgesallargati onsulle thedue twoestremità endsdel oftubo the C-shaped metal pipe withmetallico a thread.C con filettatura.
  4. Posizionare le 2 rondelle lisce con i bordi allargati sulle due estremità del tubo metallico a C con filettatura.
  5. Spalare l'angolo metallico a L sulle due estremità del tubo metallico a C con una filettatura in modo che l'estremità più lunga sia in posizione verticale..
  6. PlacePosizionare thele 2 plainrondelle washersdentate withsulle extendeddue edgesestremità ondel thetubo two ends of the C-shaped metal pipe withmetallico a thread.
    C con filettatura.
  7. ShovelPosizionare thei L-shaped2 metaldadi corneresagonali onM8 thesulle twodue endsestremità ofdel thetubo C-shaped metal pipe withmetallico a threadC socon thatfilettatura. theUtilizzare longerla endchiave isaperta misura 13 per avvitare saldamente i dadi esagonali all'angolare metallico a L.
  8. Posizionare il motore sull'albero dello sterzo.
  9. Spostare l'angolo metallico a L verso l'alto in amodo verticalche position.
    tocchi la parte inferiore del motore.
  10. PlaceSpostare theil motore in modo che i fori per le viti siano direttamente in linea con i canali dell'angolo metallico a L.
  11. Inserire le 2 toothedviti lockM5 washerscon onrondelle thepiane twoe endsrondelle ofdi thesicurezza C-shapednei metalfori pipeper withle aviti thread.
    sul fondo del motore.
  12. PlaceUtilizzare thela 2chiave hexaperta nuts M8 washers on the two ends of the C-shaped metal pipe with a thread.
  13. Use the open-end wrench size 13 to screw the hex nuts to the L-shaped metal corner securely.
  14. Place the Motor on the steering shaft.
  15. Move the L-shaped metal corner up so that it touches the bottom of the Motor.
  16. Move the Motor so that the screw holes are directly in line with the channels of the L-shaped metal corner.
  17. Place the 2 screws M5 with plain washers and spring lock washers in the screw holes on the bottom of the Motor.
  18. Use the open wrench sizemisura 8 toper screwavvitare thesaldamente screwsle firmly.
    viti.
RequiredStrumenti tools
necessari
  • Open-endChiave wrenchaperta sizemisura 17
  • Open-endChiave wrenchaperta sizemisura 13

  • OpenChiave wrencha sizepenna misura 8

PowerSteer_manual_25.10_eng53.webp


YouSui candispositivi horizontallymobili scrollè thepossibile tablescorrere onorizzontalmente mobile.la tabella.