|
You have received one of the three possible Anti-rotation brackets depending on your steering shaft specification. Look at the illustrations and confirm which option was included in your package. Please go to the following pages to access the instruction concerning each option:
-
Anti-rotation bracket -01
-
Anti-rotation bracket -02
-
Anti-rotation bracket -03
|
You can horizontally scroll the table on mobile.

|
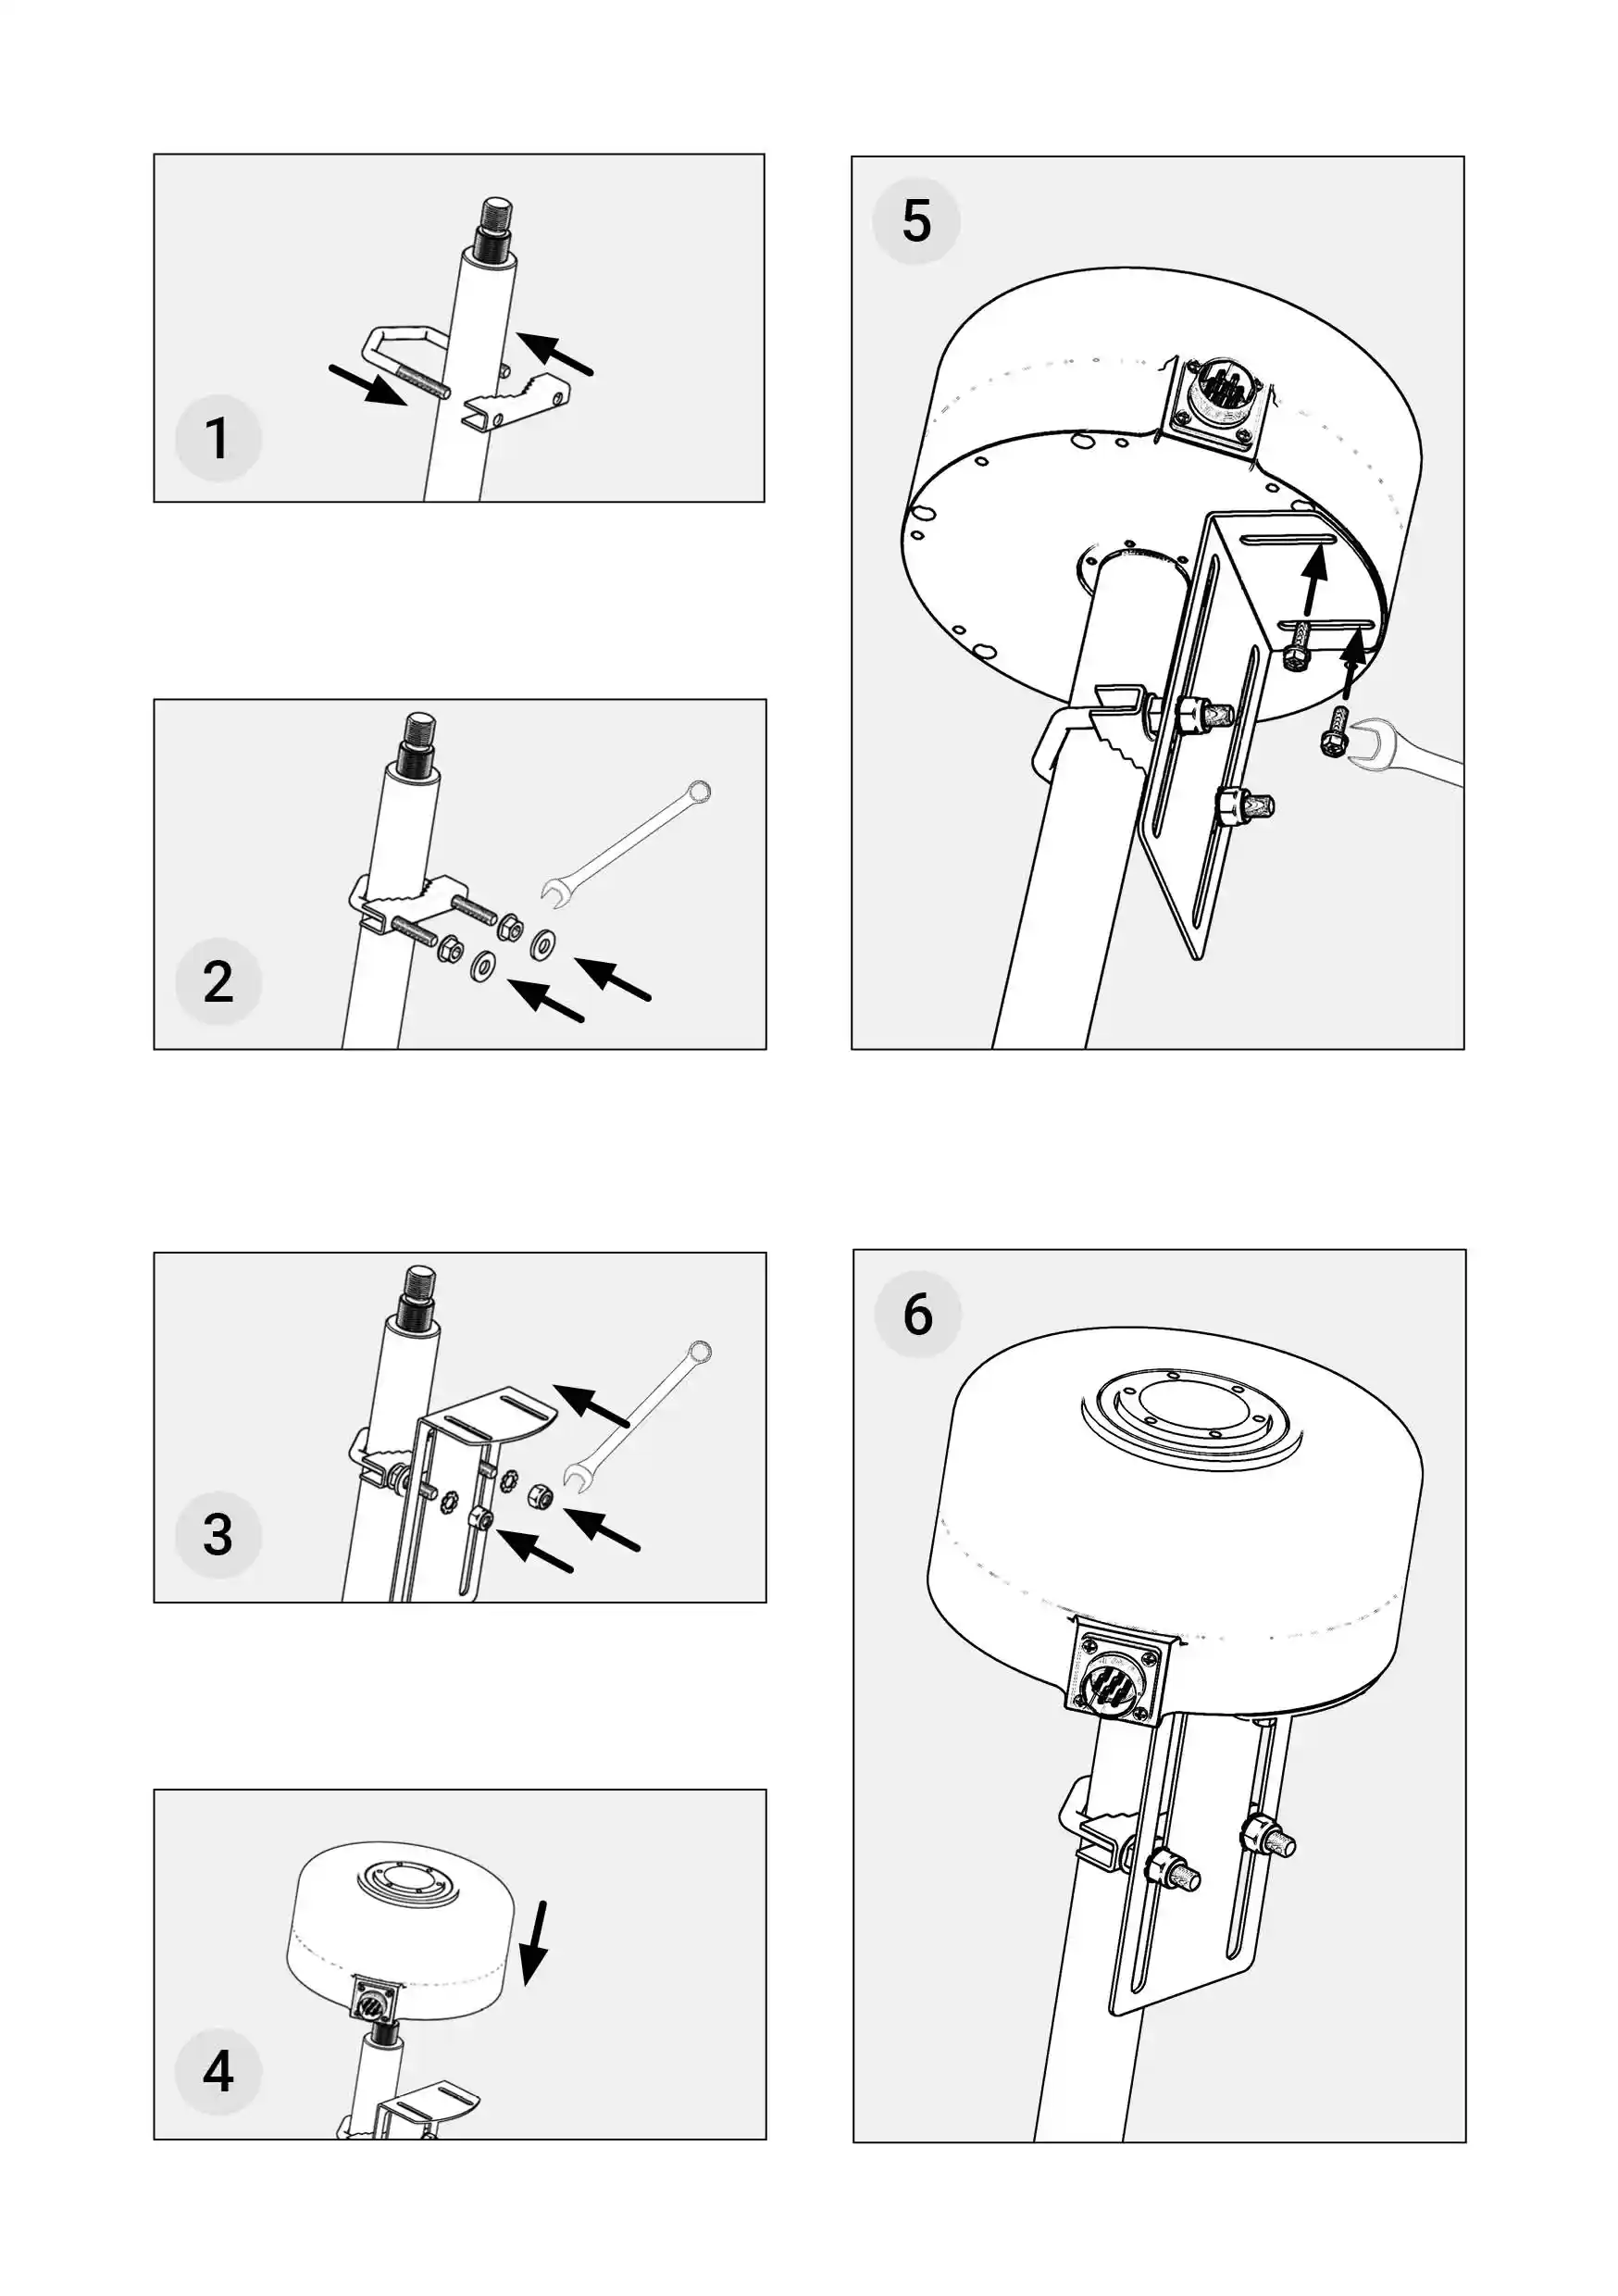
Anti-rotation bracket -01
In the package:
- 1 pipe clamp
- 1 L-shape metal corner
- 2 hex nuts M8 (for open-end wrench size 13mm)
- 2 plain washers
- 2 toothed lock washers
- 2 hex nuts with extended edges
- 2 screws M5 with plain washers and spring lock washers (for open-end wrench 8mm)
- C-shaped metal pipe with a thread
- Metal stabilizer
- The Motor
- Open-end wrench size 13
-
Open wrench size 8
Information
In the case of the Anti-rotation bracket -01 the steps of assembling the equipment and mounting it to the steering shaft have been covered together.
|

|
Anti-rotation bracket -01
How to mount it?
- Take the C-shaped metal pipe with a thread and shovel it on the steering shaft rod around 5 centimeters below the end of the steering shaft.
-
Place the metal stabilizer on the two ends of the C-shaped metal pipe with a thread.
- Place the 2 hex nuts with extended edges on the two ends of the C-shaped metal pipe with a thread.
- Place the 2 plain washers with extended edges on the two ends of the C-shaped metal pipe with a thread.
- Shovel the L-shaped metal corner on the two ends of the C-shaped metal pipe with a thread so that the longer end is in a vertical position.
- Place the 2 toothed lock washers on the two ends of the C-shaped metal pipe with a thread.
- Place the 2 hex nuts M8 washers on the two ends of the C-shaped metal pipe with a thread.
- Use the open-end wrench size 13 to screw the hex nuts to the L-shaped metal corner securely.
- Place the Motor on the steering shaft.
- Move the L-shaped metal corner up so that it touches the bottom of the Motor.
- Move the Motor so that the screw holes are directly in line with the channels of the L-shaped metal corner.
- Place the 2 screws M5 with plain washers and spring lock washers in the screw holes on the bottom of the Motor.
- Use the open wrench size 8 to screw the screws firmly.
- Open-end wrench size 17
-
Open-end wrench size 13
- Open wrench size 8
|
|
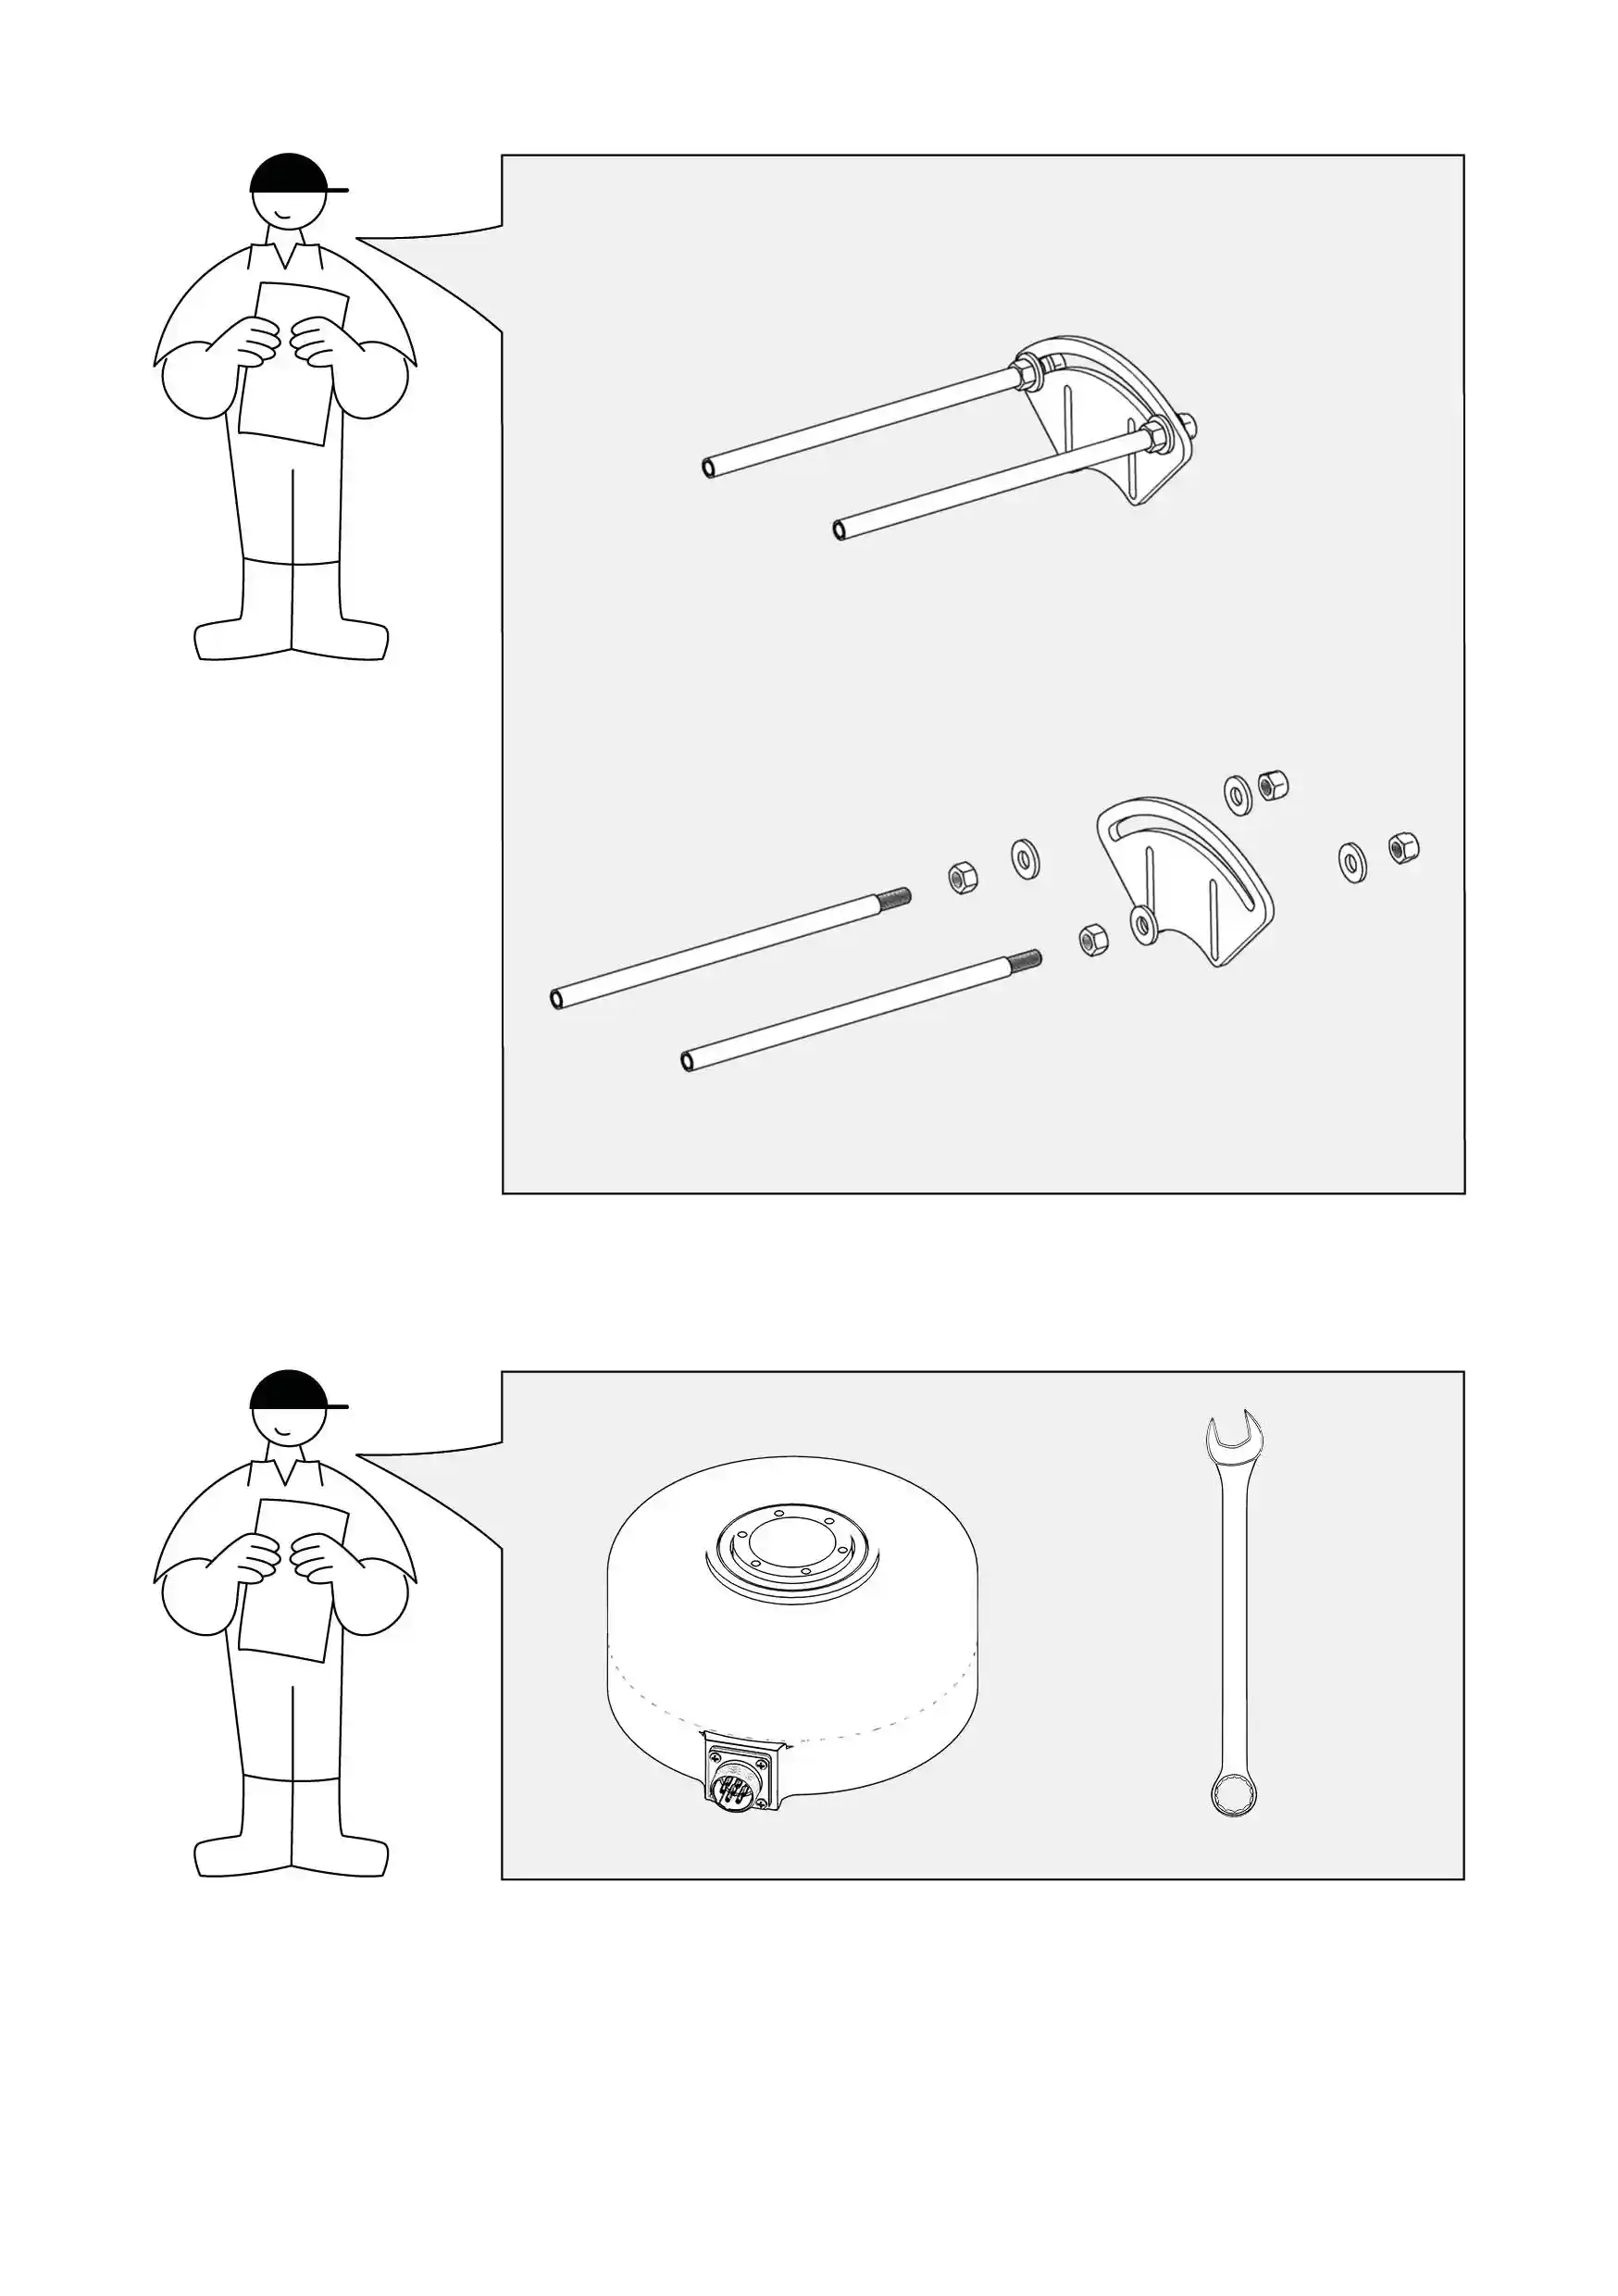
Anti-rotation bracket -02
In the package:
- 1 metal plate
- 2 metal pins
- 4 hex nuts
- 4 plain washers
- 2 spring roll washers
- 2 screws
- Open-end wrench size 17
- Open-end wrench size 13
- Open wrench size 8
|
|
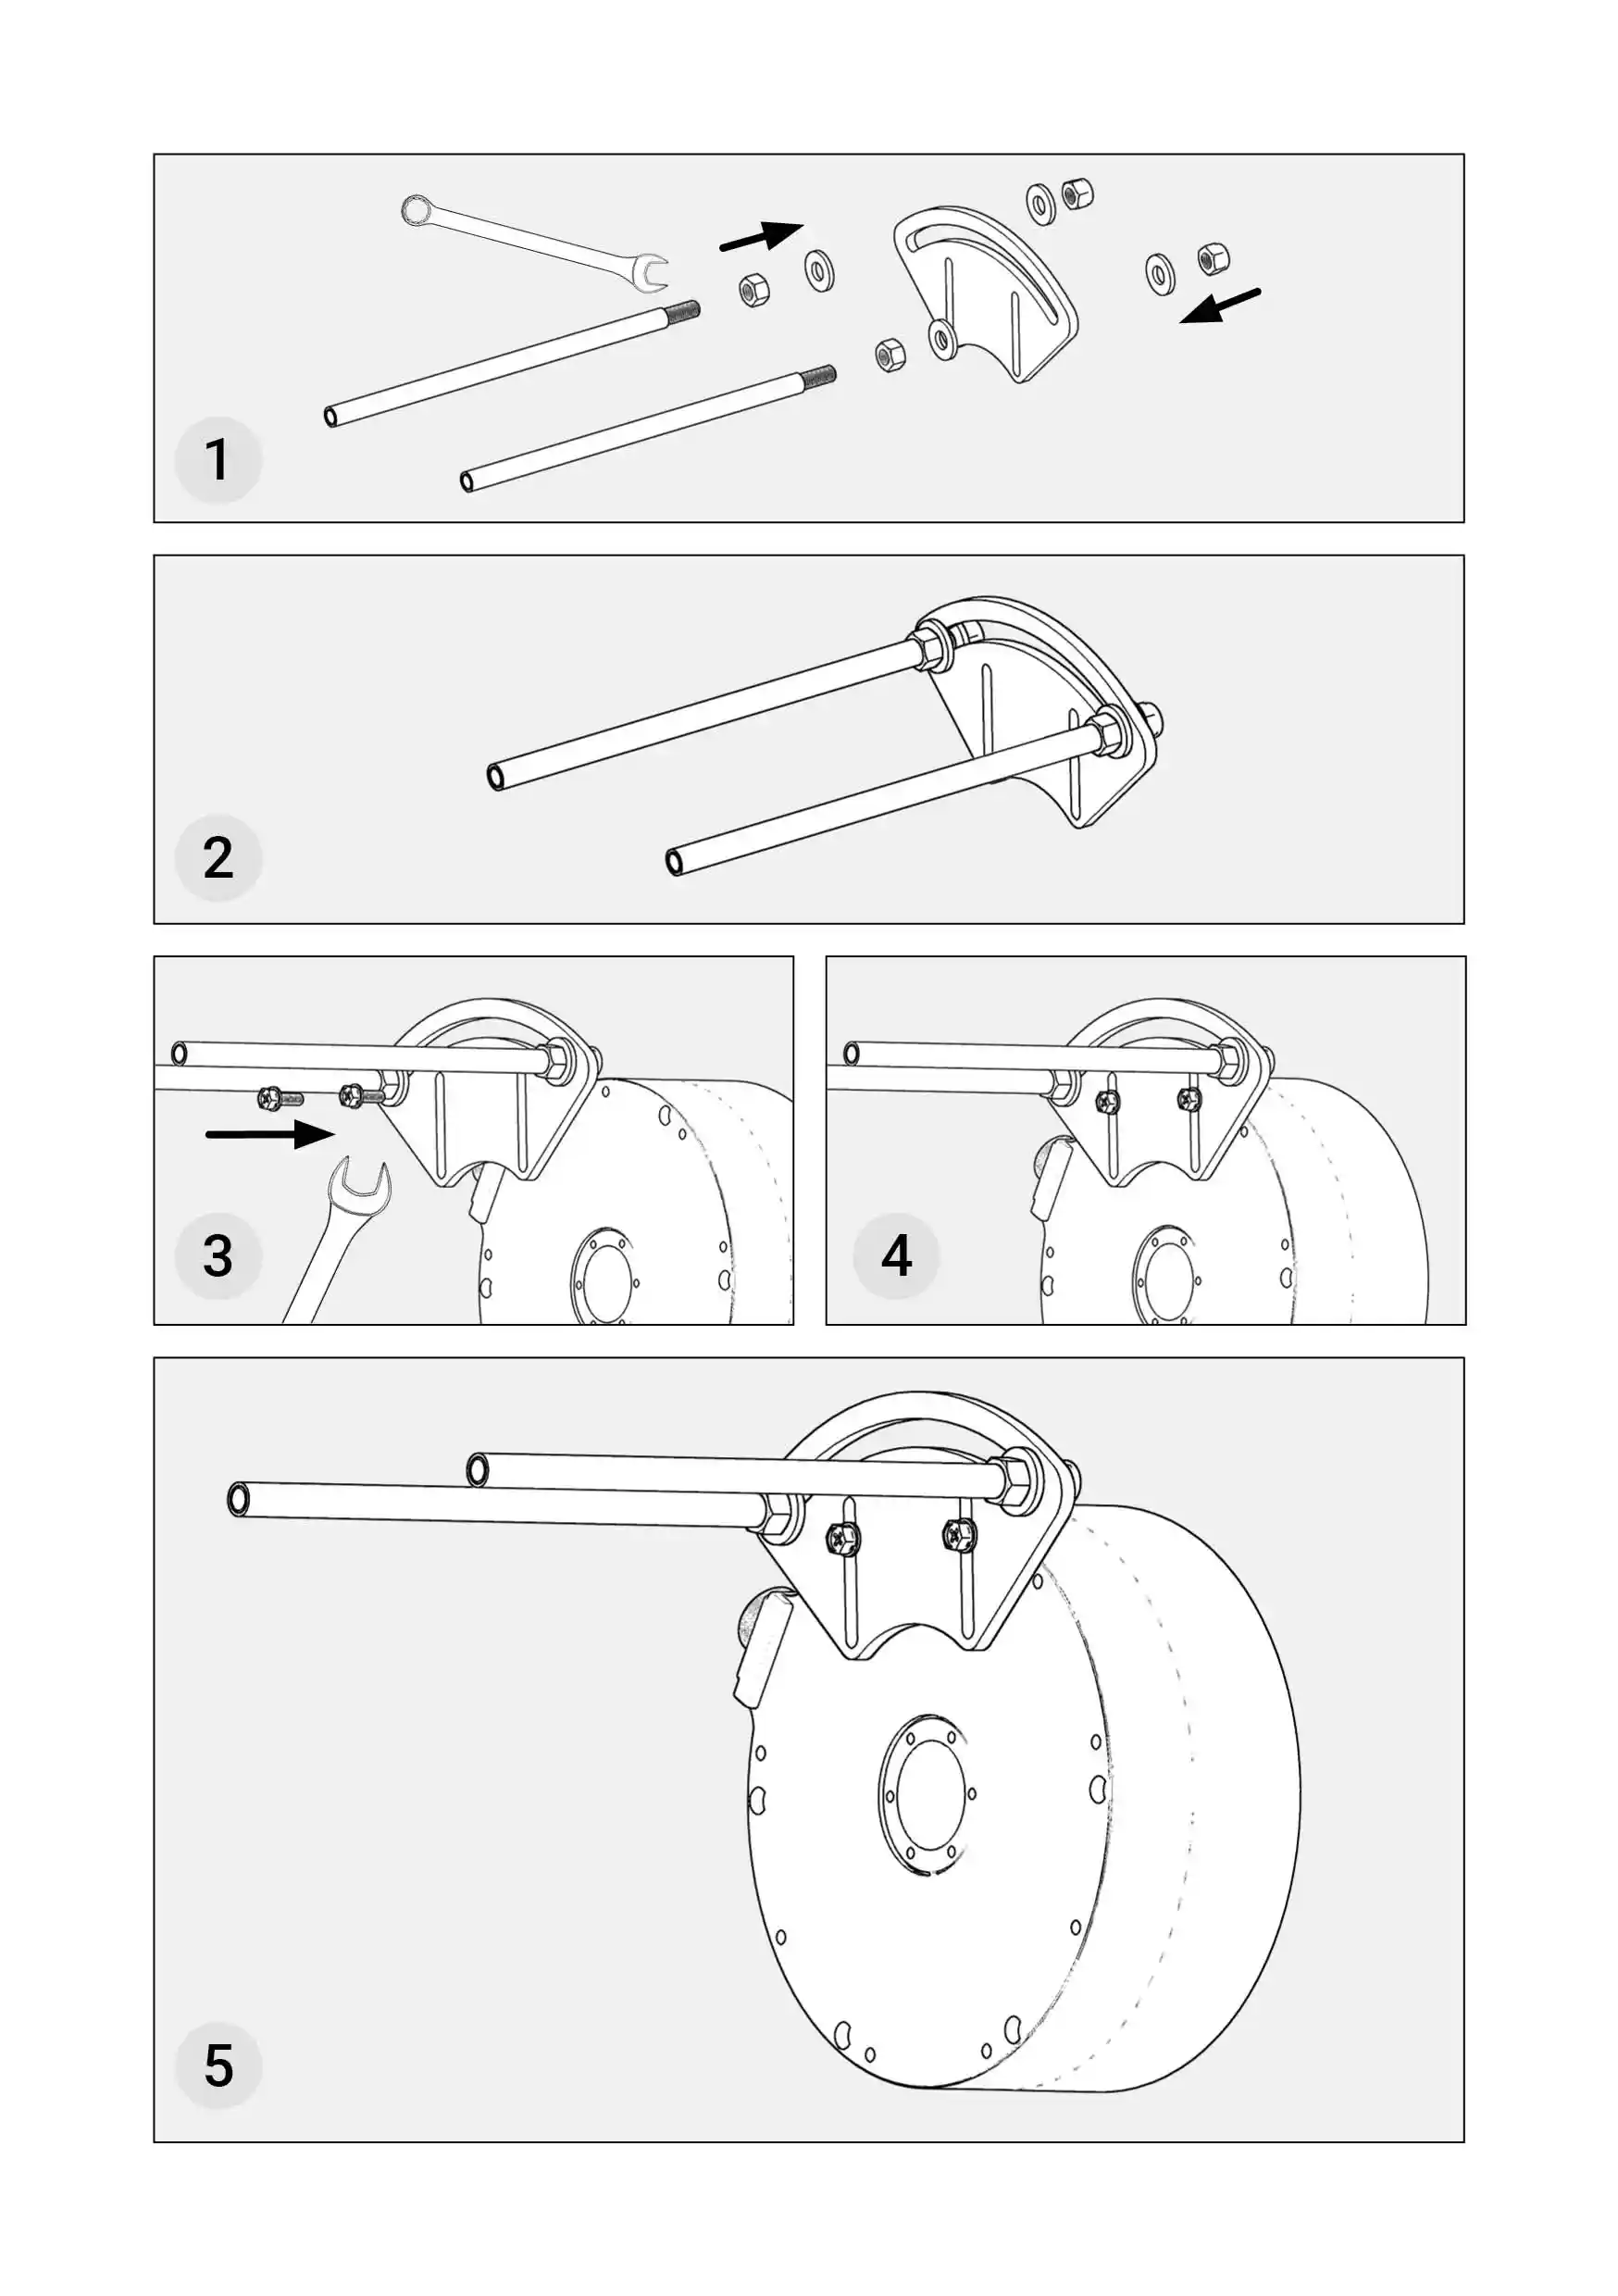
Anti-rotation bracket -02
How to mount it?
- Place the Motor on a flat surface.
- Turn the Motor around and place it on its head. You will recognize the bottom of the Motor by 6 hex screws located near the edge.
- Place the metal plate on the bottom of the Motor, ensuring that it is positioned opposite the power socket.
- Ensure that the channels of the metal plate are directly in line with the screw holes.
- Place 2 hex screws in the screw holes that are directly in line with the channels of the metal plate.
- Use the open wrench size 8 to screw the 2 hex screws firmly.
- Put the 4 plain washers on the 4 hex nuts.
- Put the 2 spring lock washers on 2 of the 4 hex nuts.
- Put the hex nut with the plain washer on the metal pin from the side without the thread.
- Ensure you first put on the plain washer and then the hex nut.
- Push the screw to the thread and screw it with 3-4 turns.
- Take the metal pin and insert the end with the thread into the round channel at the edge of the metal plate and move it to the far end of the channel.
- Take a hex nut with a plain washer and the spring lock washer and put it on the metal pin on the end with the thread.
- Ensure you first put on the spring lock washer, then the plain washer, and finally the hex nut.
- Use the open-end wrench size 13 to screw the hex nut firmly to the metal plate.
- Repeat the above steps for the other metal pin that is to be put on the opposite side of the channel on the edge of the metal plate.
|
|
Anti-rotation bracket -02
Mount the Motor to the steering shaft
---
- Open-end wrench (size is dependent on the width of the steering shaft).
How to mount it?
- Place the motor on the steering shaft in a way that the anti-rotation pins are facing the seat.
- Push the motor hard to ensure it is firmly placed on the steering shaft.
- Place the nut on the top of the steering shaft and turn it 3-4 times with your hands.
- Use the open-end wrench to screw the nut firmly to the steering shaft.
Tips
- You can cut the excessive length of the pin for more comfortable use.
|
|
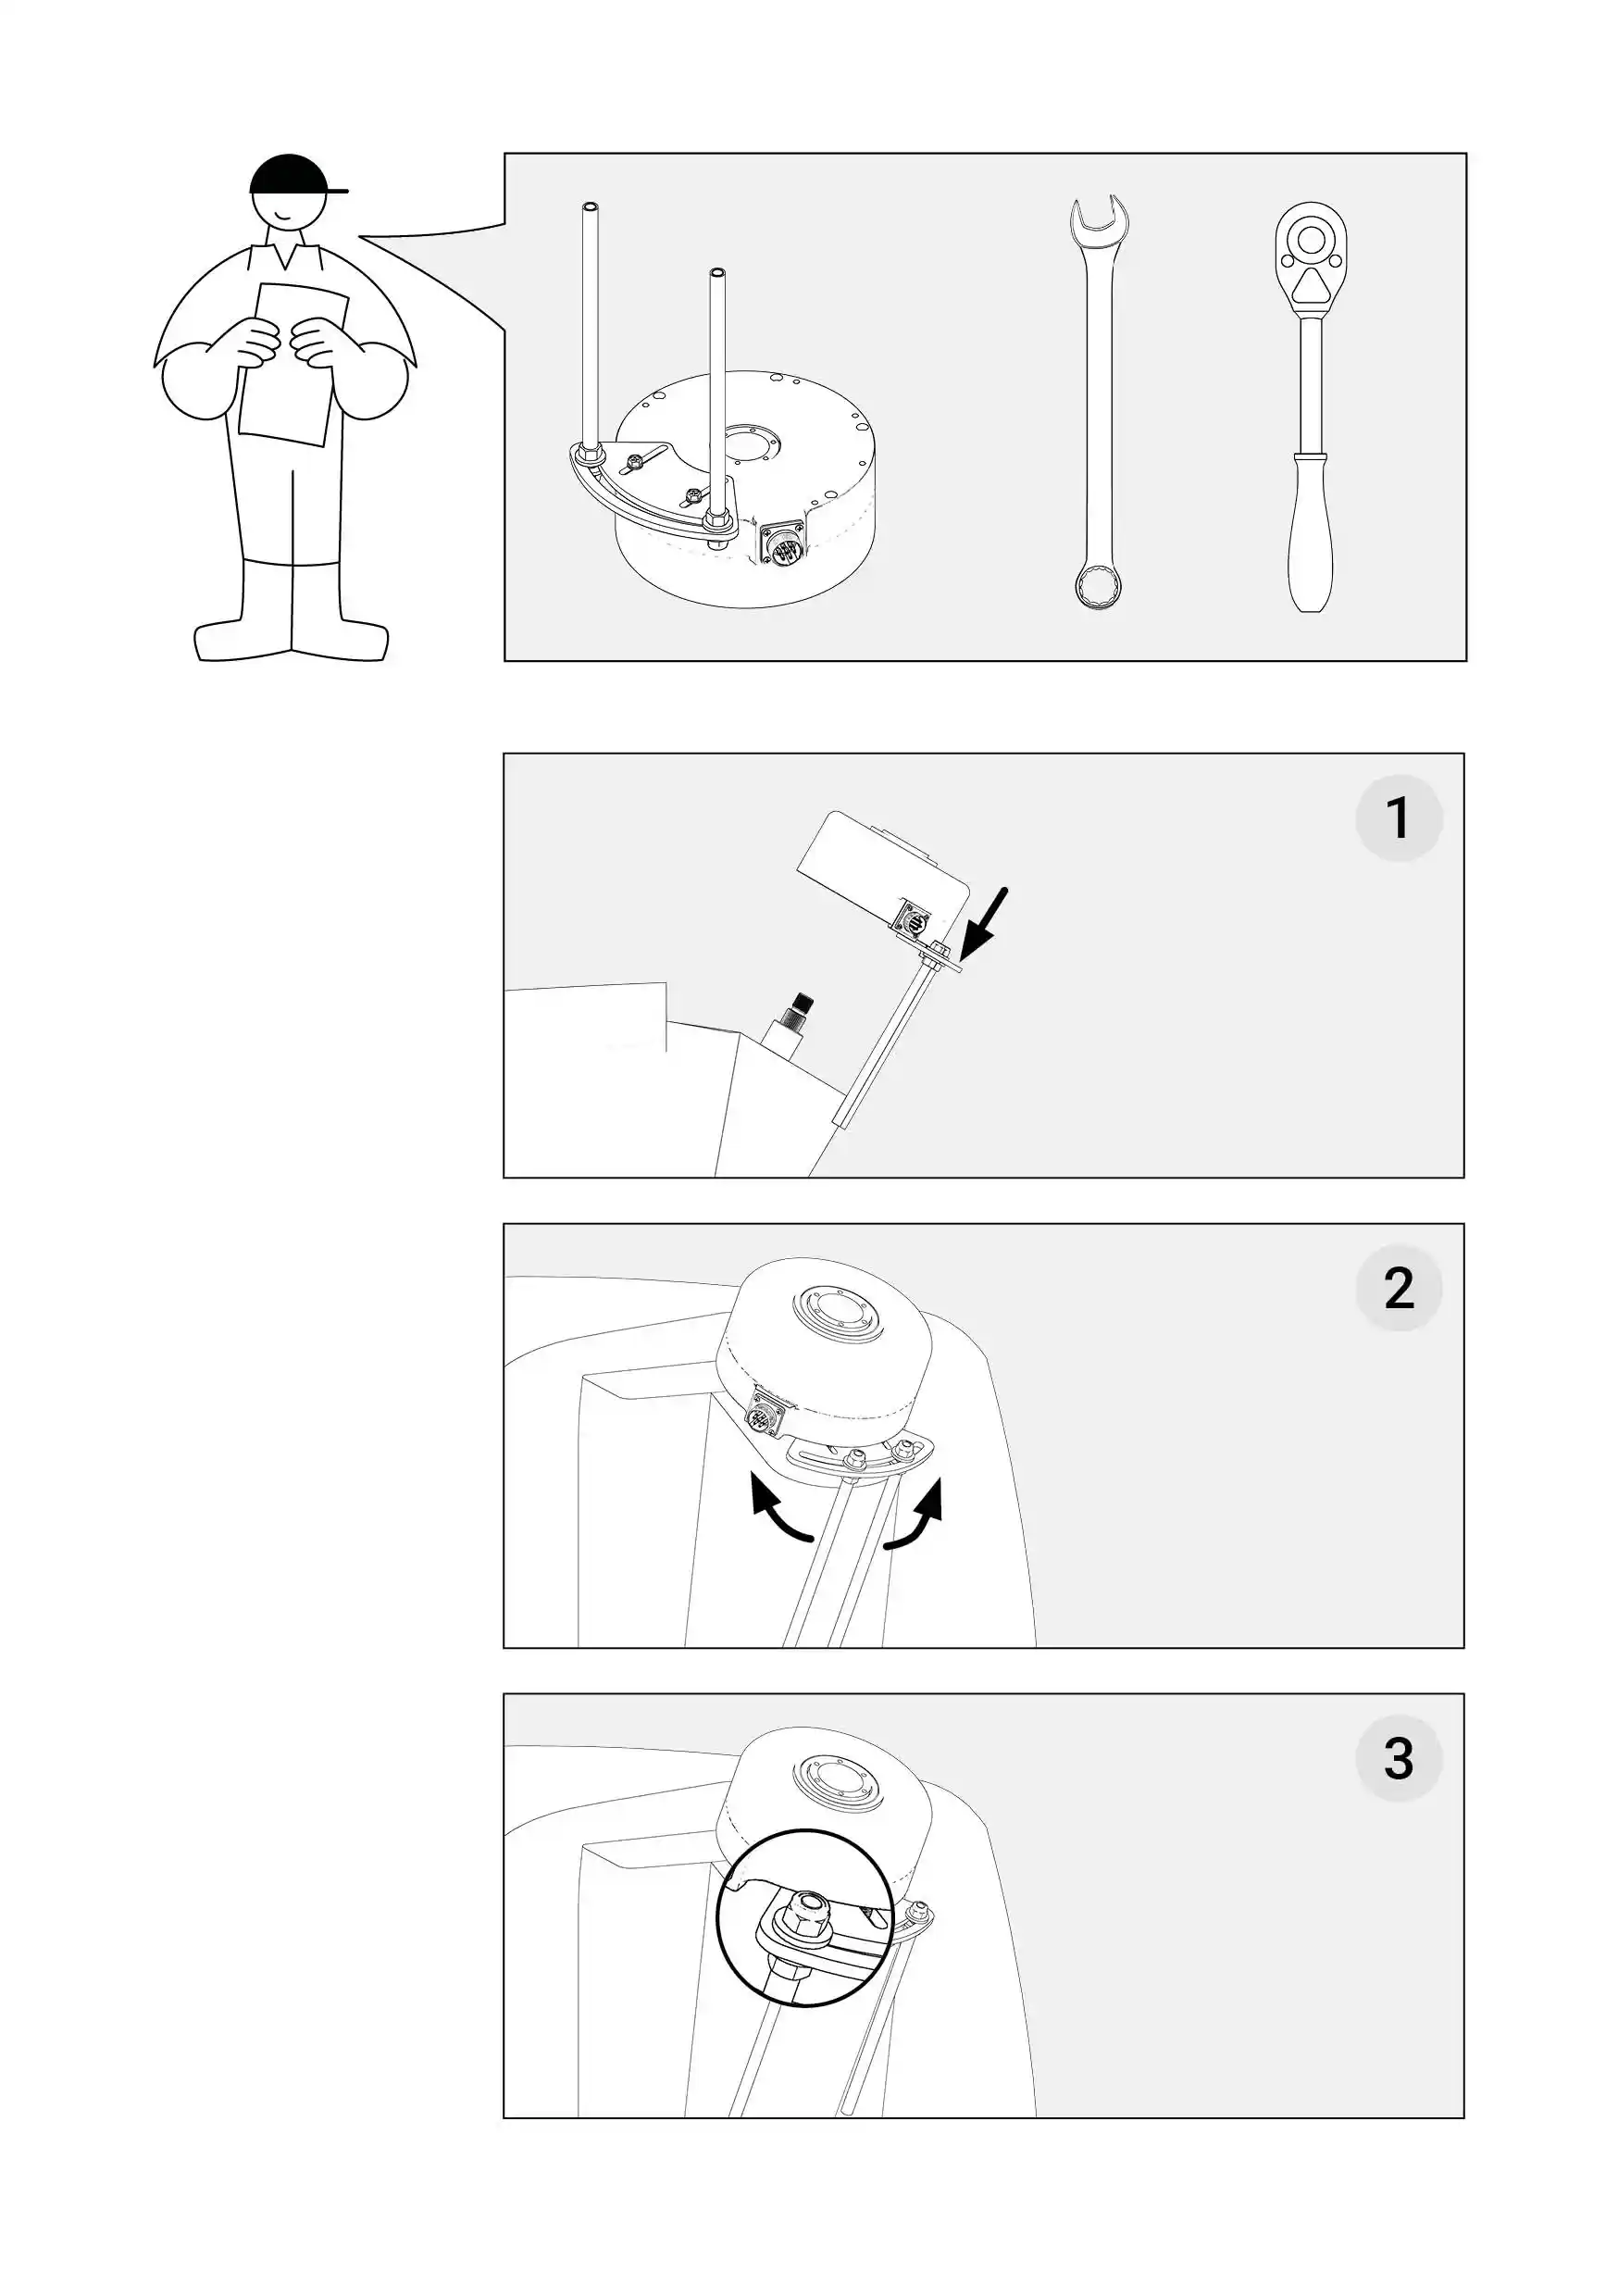
Anti-rotation bracket -02
Fix the Anti-rotation bracket -02
---
Required tools
How to do it?
- Use the open-end wrench size 13 to loosen the hex nut located on the metal pin above the metal plate.
- Push the metal pin to one end of the channel of the metal plate so that it firmly presses the steering dashboard.
- While pressing the metal pin to the steering dashboard, screw the hex nut firmly with the open-end wrench size 13.
- Take the PowerWheel and shake it firmly to check whether it moves.
- If you can shake the PowerWheel, unscrew the hex nut with an open-end wrench size 13 and press the metal pin more firmly to the dashboard and then screw it again.
|

|
Anti-rotation bracket -03
Assemble the Motor and the Anti-rotation Bracket (-03)
---
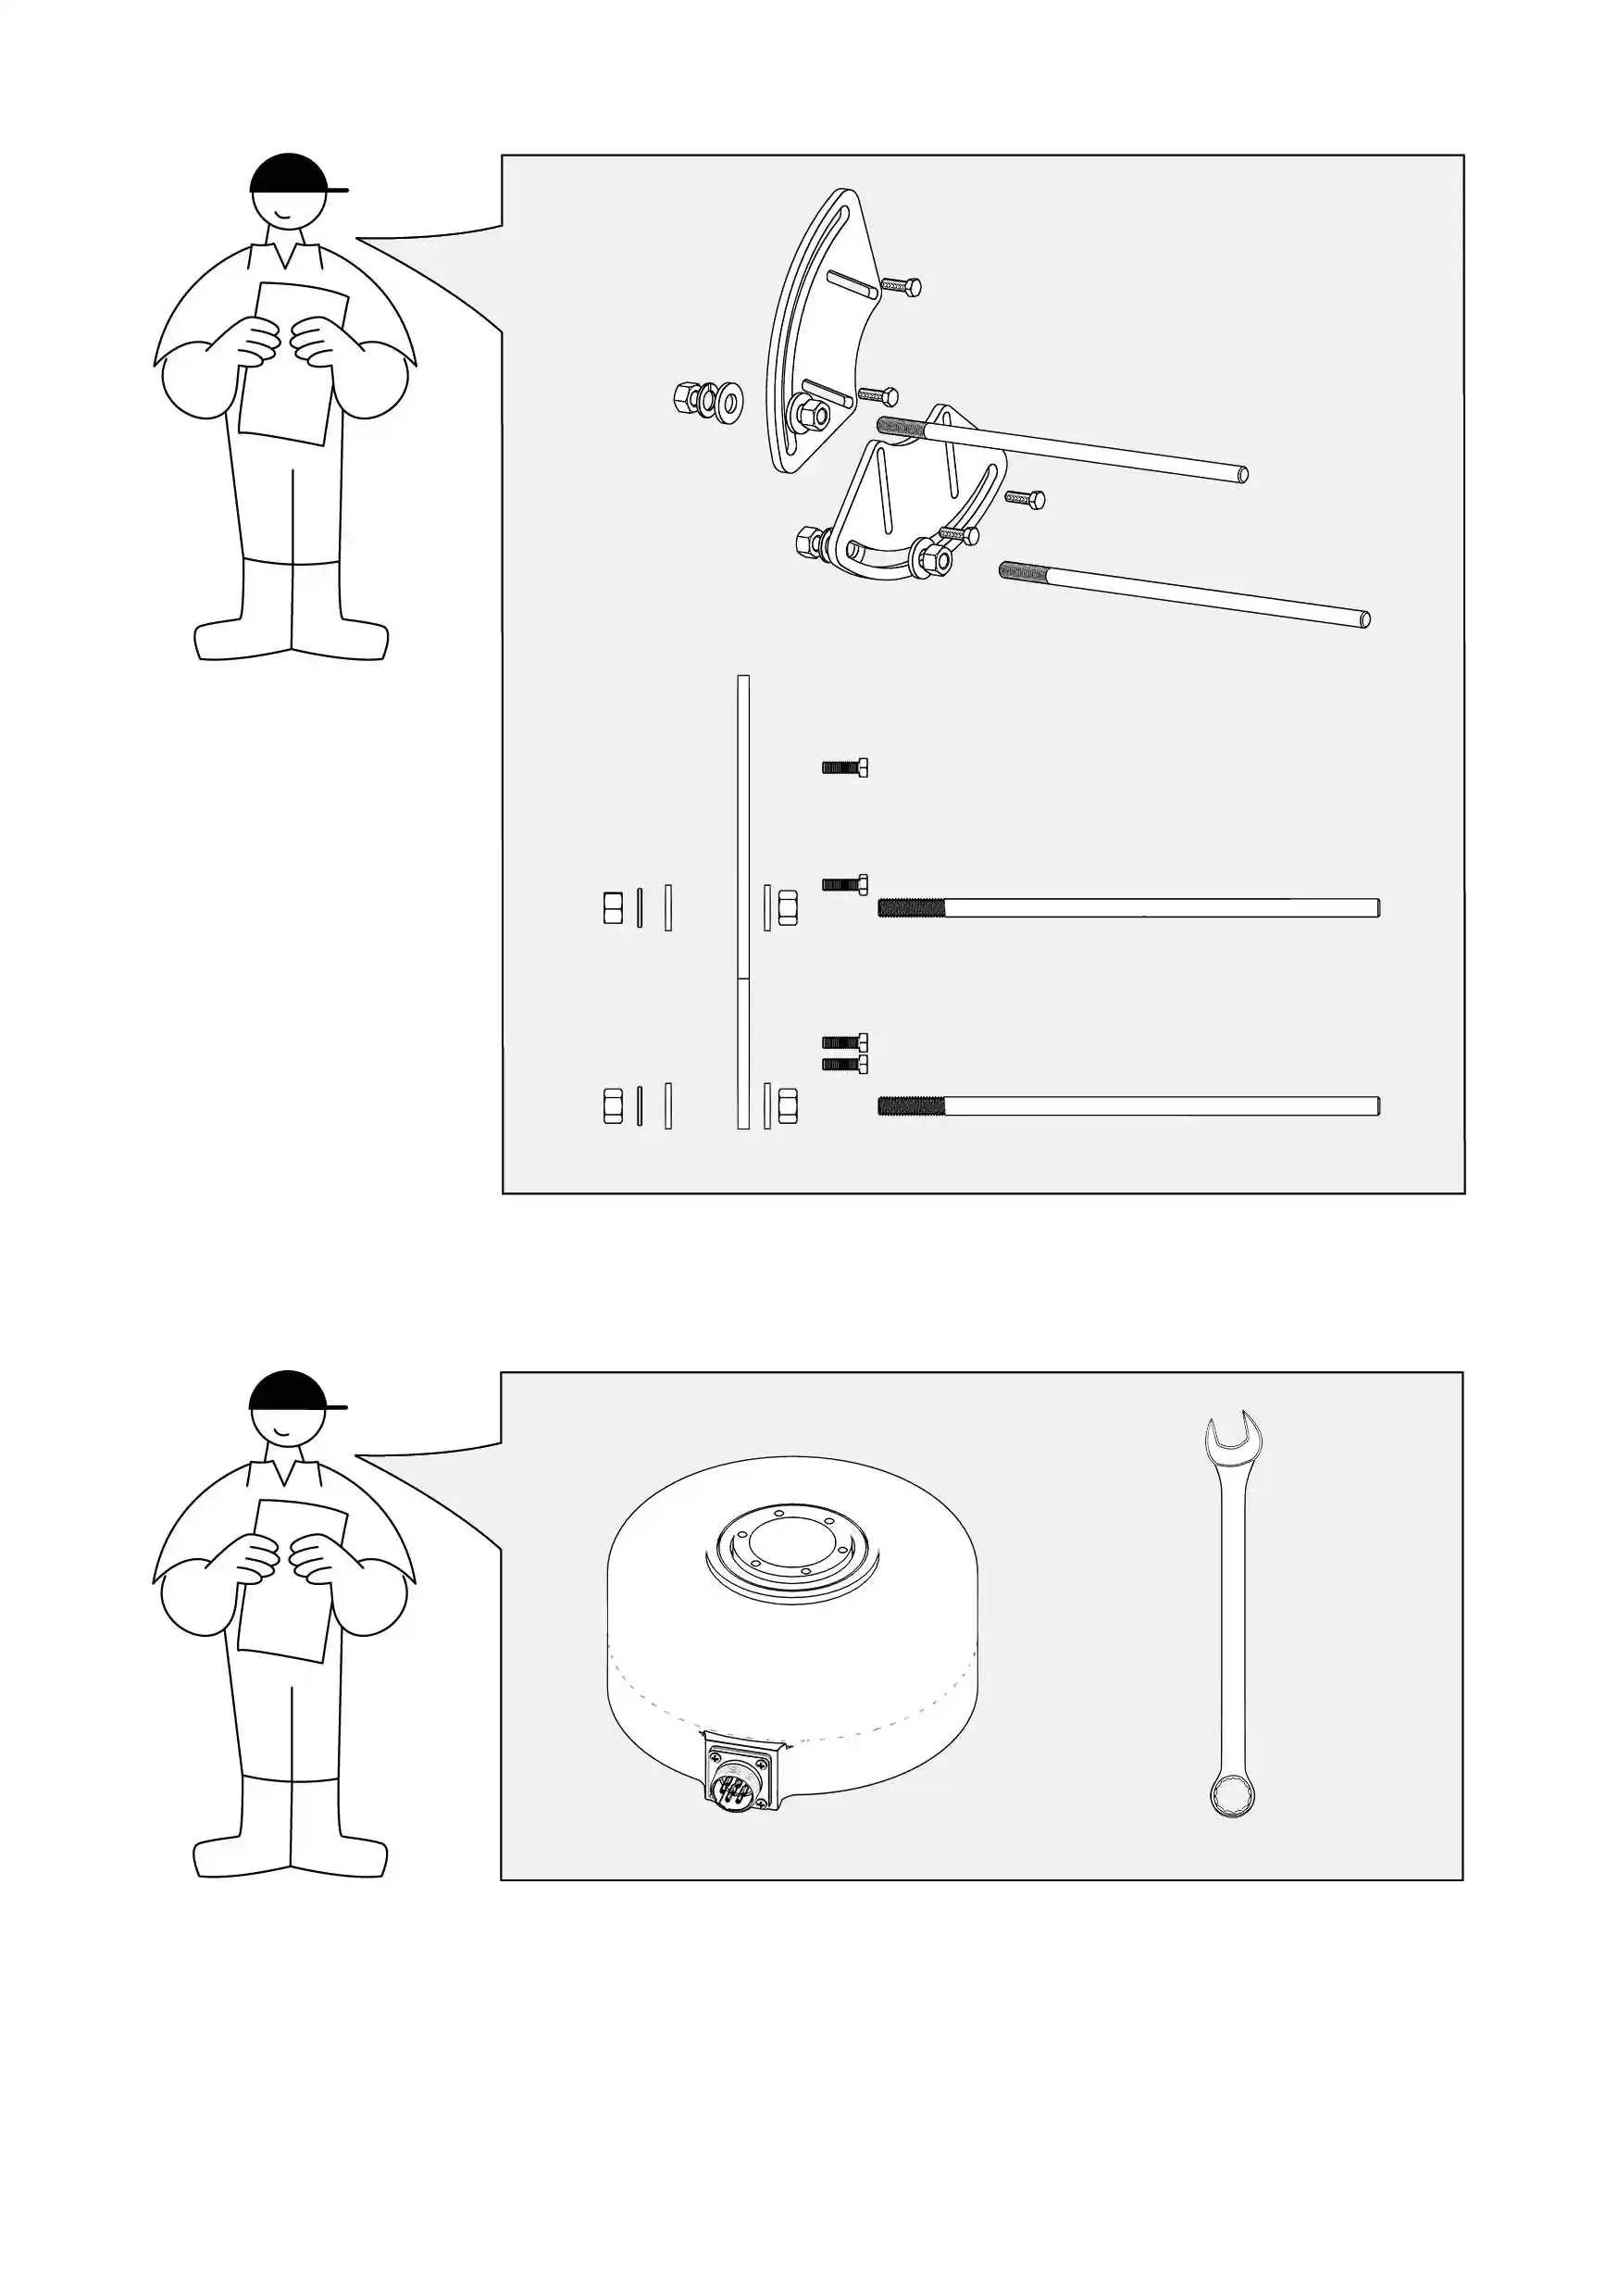
In the package
- 2 metal plates
- 2 metal pins
- 4 hex nuts
- 4 plain washers
- 2 spring lock washers
- 4 screws
Required items
- Open-end wrench size 17
- Open-end wrench size 13
- Open wrench size 8
- Motor with Wheel Adapter
|
|
Anti-rotation bracket -03
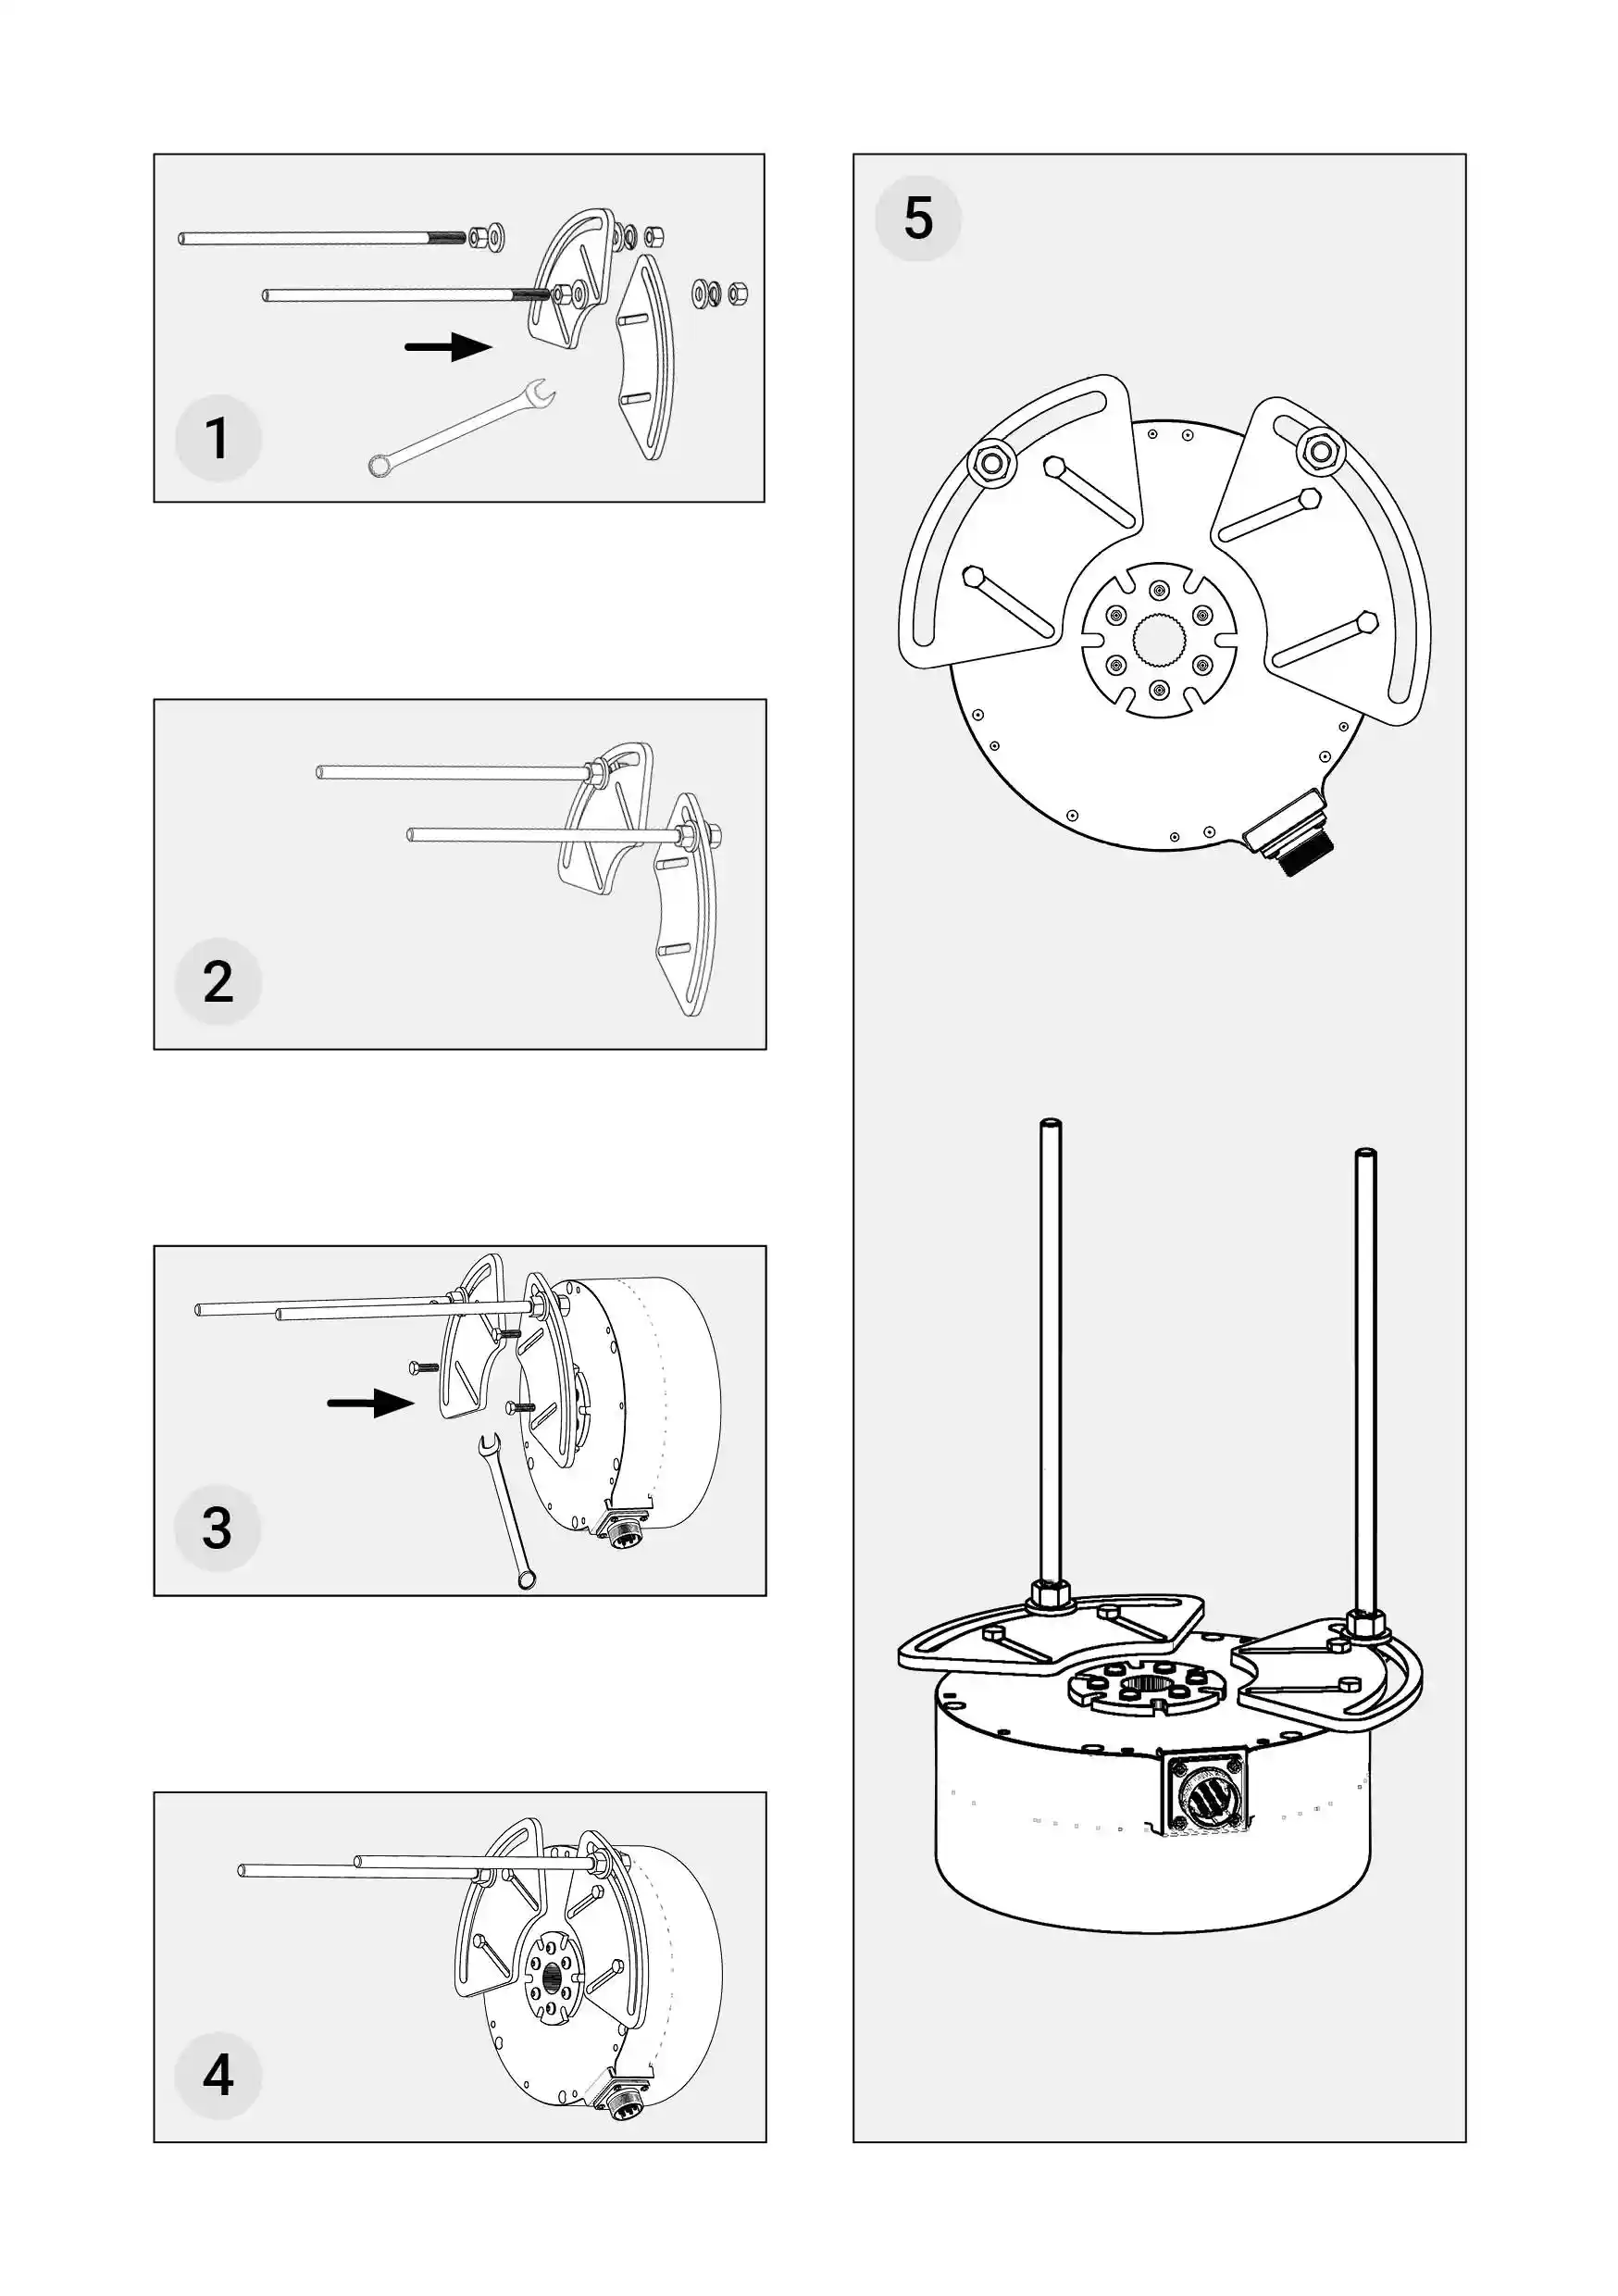
How to mount it?
- Place the Motor on a flat surface.
- Turn the Motor around and place it on its head. You will recognize the bottom of the Motor by 6 hex screws located near the edge.
- Place the 2 metal plates on the bottom of the Motor, ensuring that they are positioned opposite the power socket.
- Ensure there is around a 2 cm break between the metal plates on the edge of the motor.
- Ensure that the channels of each metal plate are directly in line with the screw holes.
- Place 4 hex screws in the screw wholes that are directly in line with the channels of each metal plate.
- Use the open wrench size 8 to screw the 4 hex screws firmly.
- Put the 4 plain washers on the 4 hex nuts.
- Put the 2 spring lock washers on the 2 of the 4 hex nuts.
- Put the hex nut with the plain washer on the metal pin from the side without the thread.
- Ensure you first put on the plain washer and then the hex nut.
- Push the screw to the thread and screw it with 3-4 turns.
- Take the metal pin and insert the end with the thread into the round channel at the edge of the metal plate
and move it to the far end of the channel.
- Take a hex nut with a plain washer and the spring lock washer and put it on the metal pin on the end with the thread.
- D Ensure you first put on the spring lock washer, then the plain washer, and finally, the hex nut.
- Use the open-end wrench size 13 to screw the hex nut firmly to the metal plate.
- Repeat the above steps for the other metal plate and the other metal pin.
|
|
Anti-rotation bracket -03
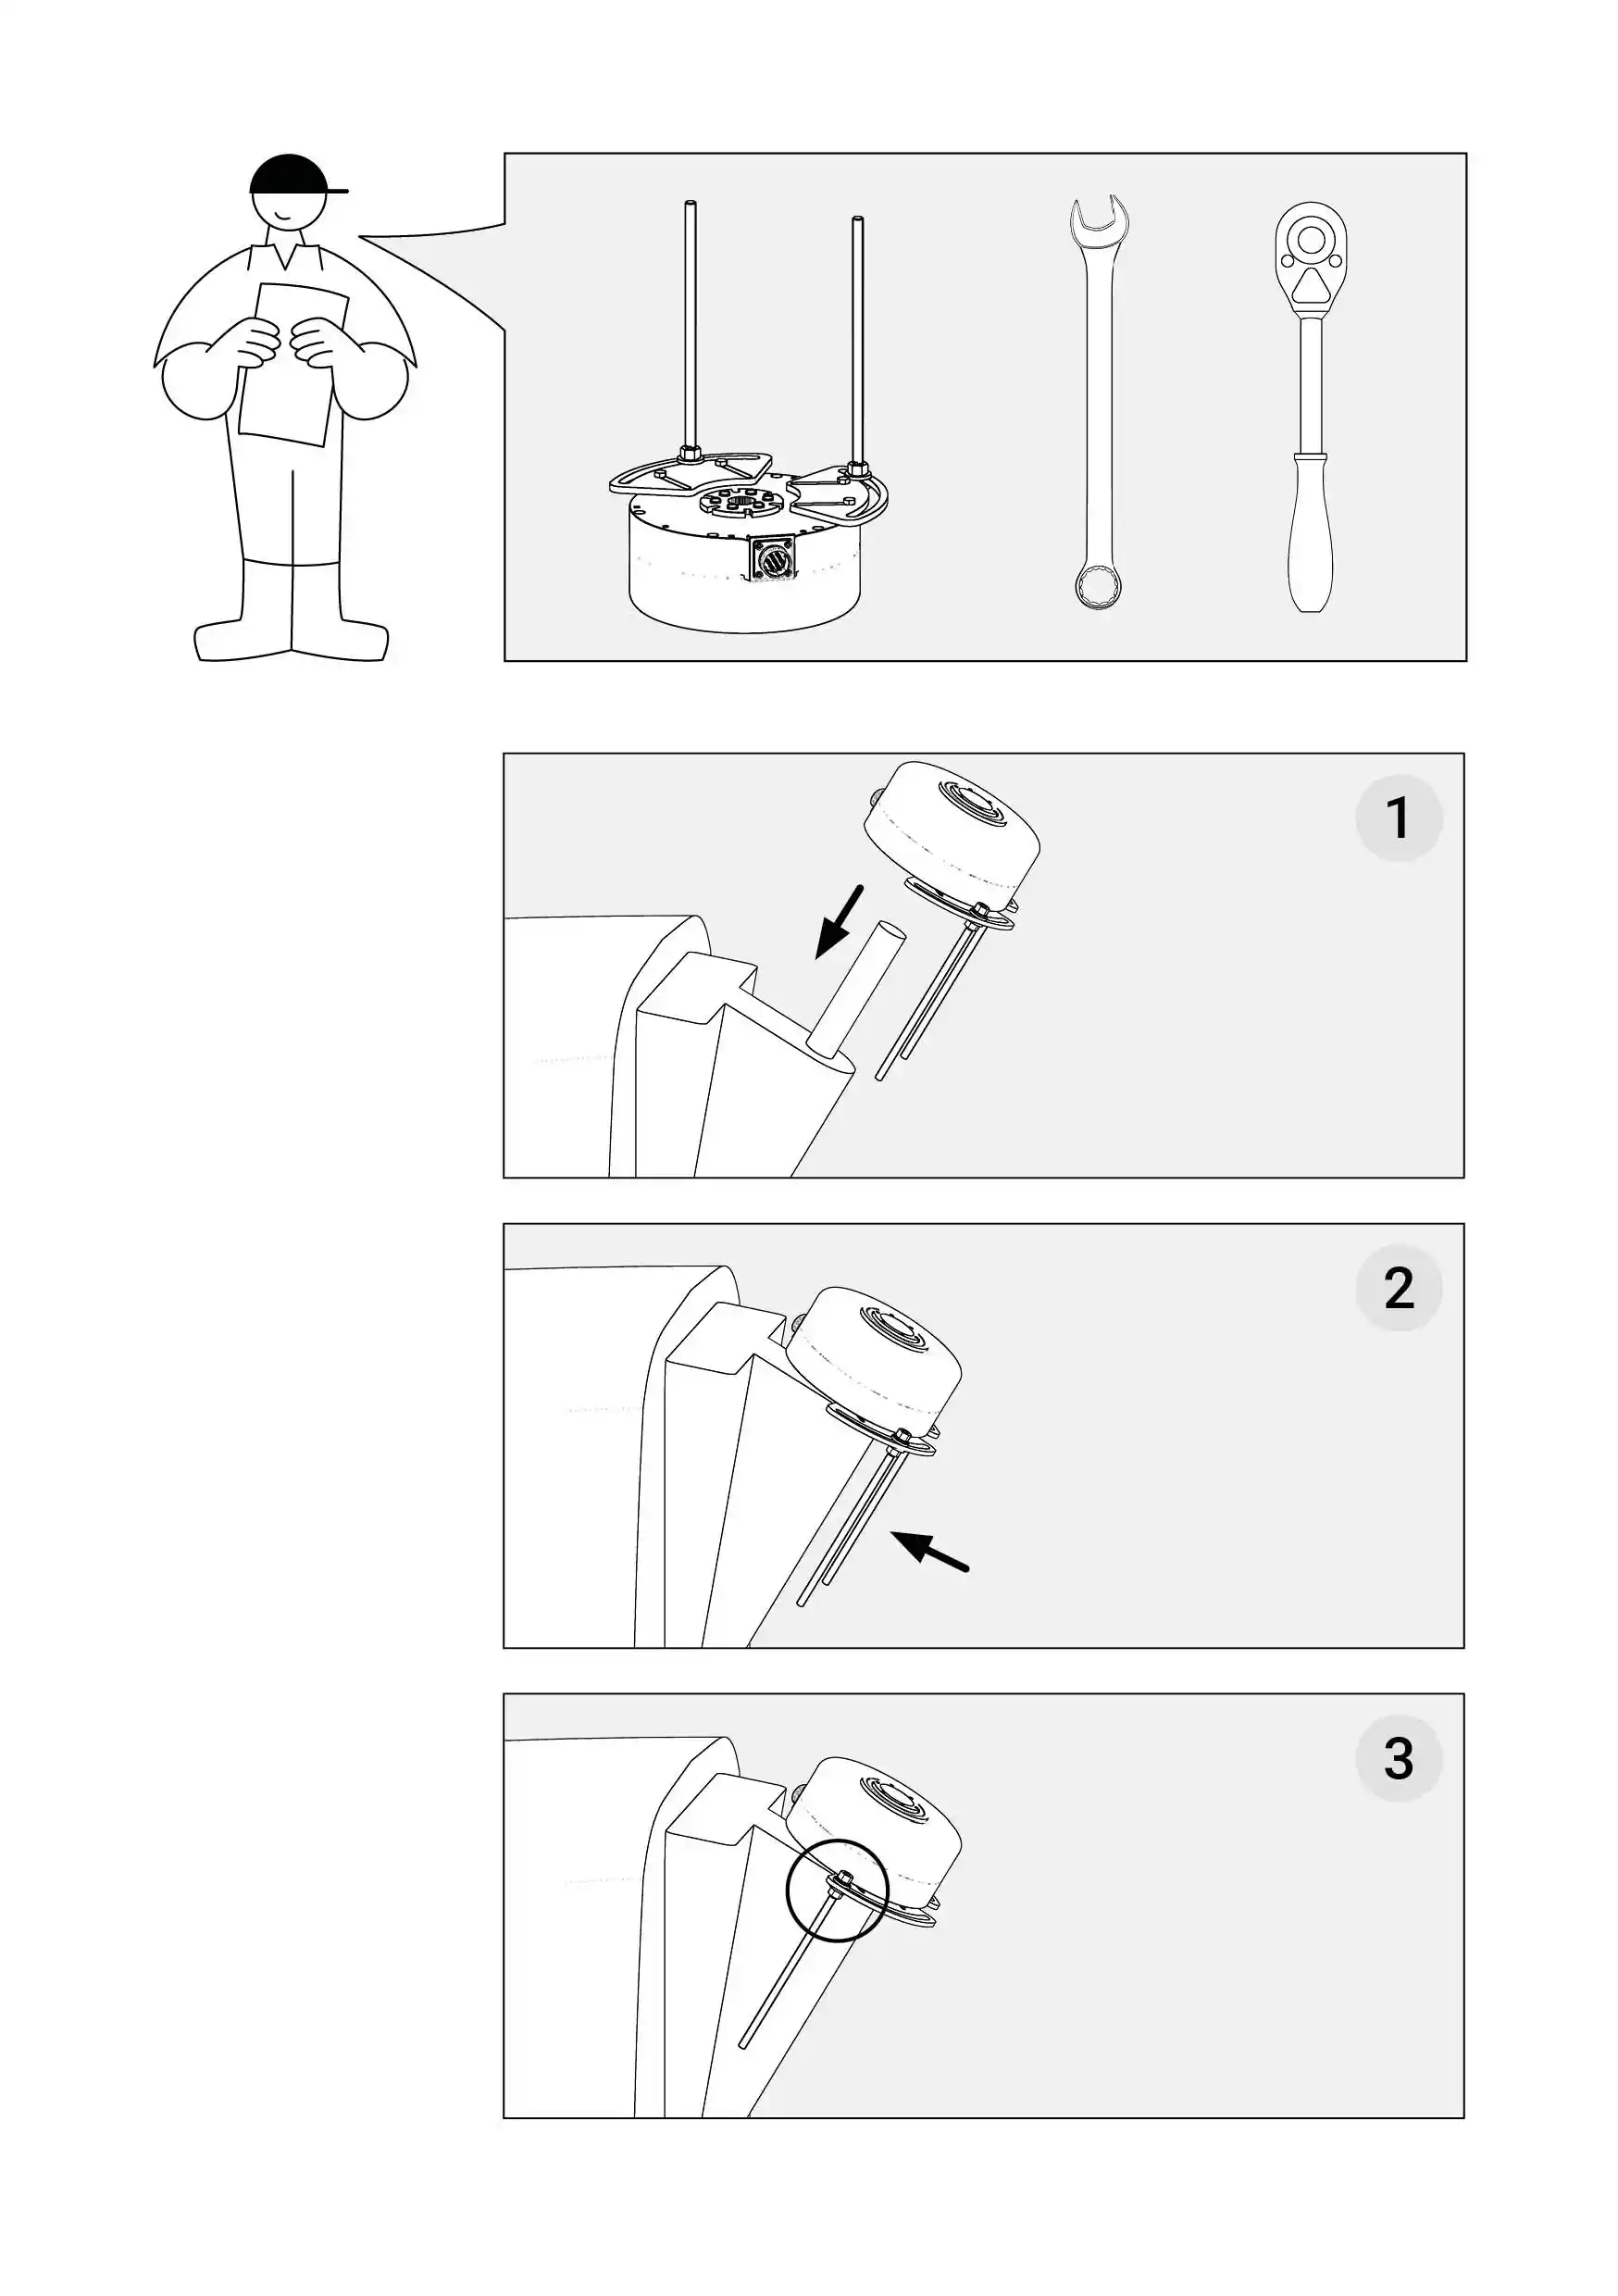
Mount the motor to the steering shaft
---
- Open-end wrench (size is dependent on the width of the steering shaft).
How to mount it?
- Place the motor on the steering shaft in a way that the anti-rotation pins are facing the seat.
- Ensure that the Controller’s power socket is facing the windscreen.
- Push the motor hard to ensure it is firmly placed on the steering shaft.
- Place the nut on the top of the steering shaft and turn it 3-4 times with your hands.
- Use the open-end wrench to screw the nut firmly to the steering shaft.
Tips
- You can cut the excessive length of the pin for more comfortable use.
|
|
Anti-rotation bracket -03
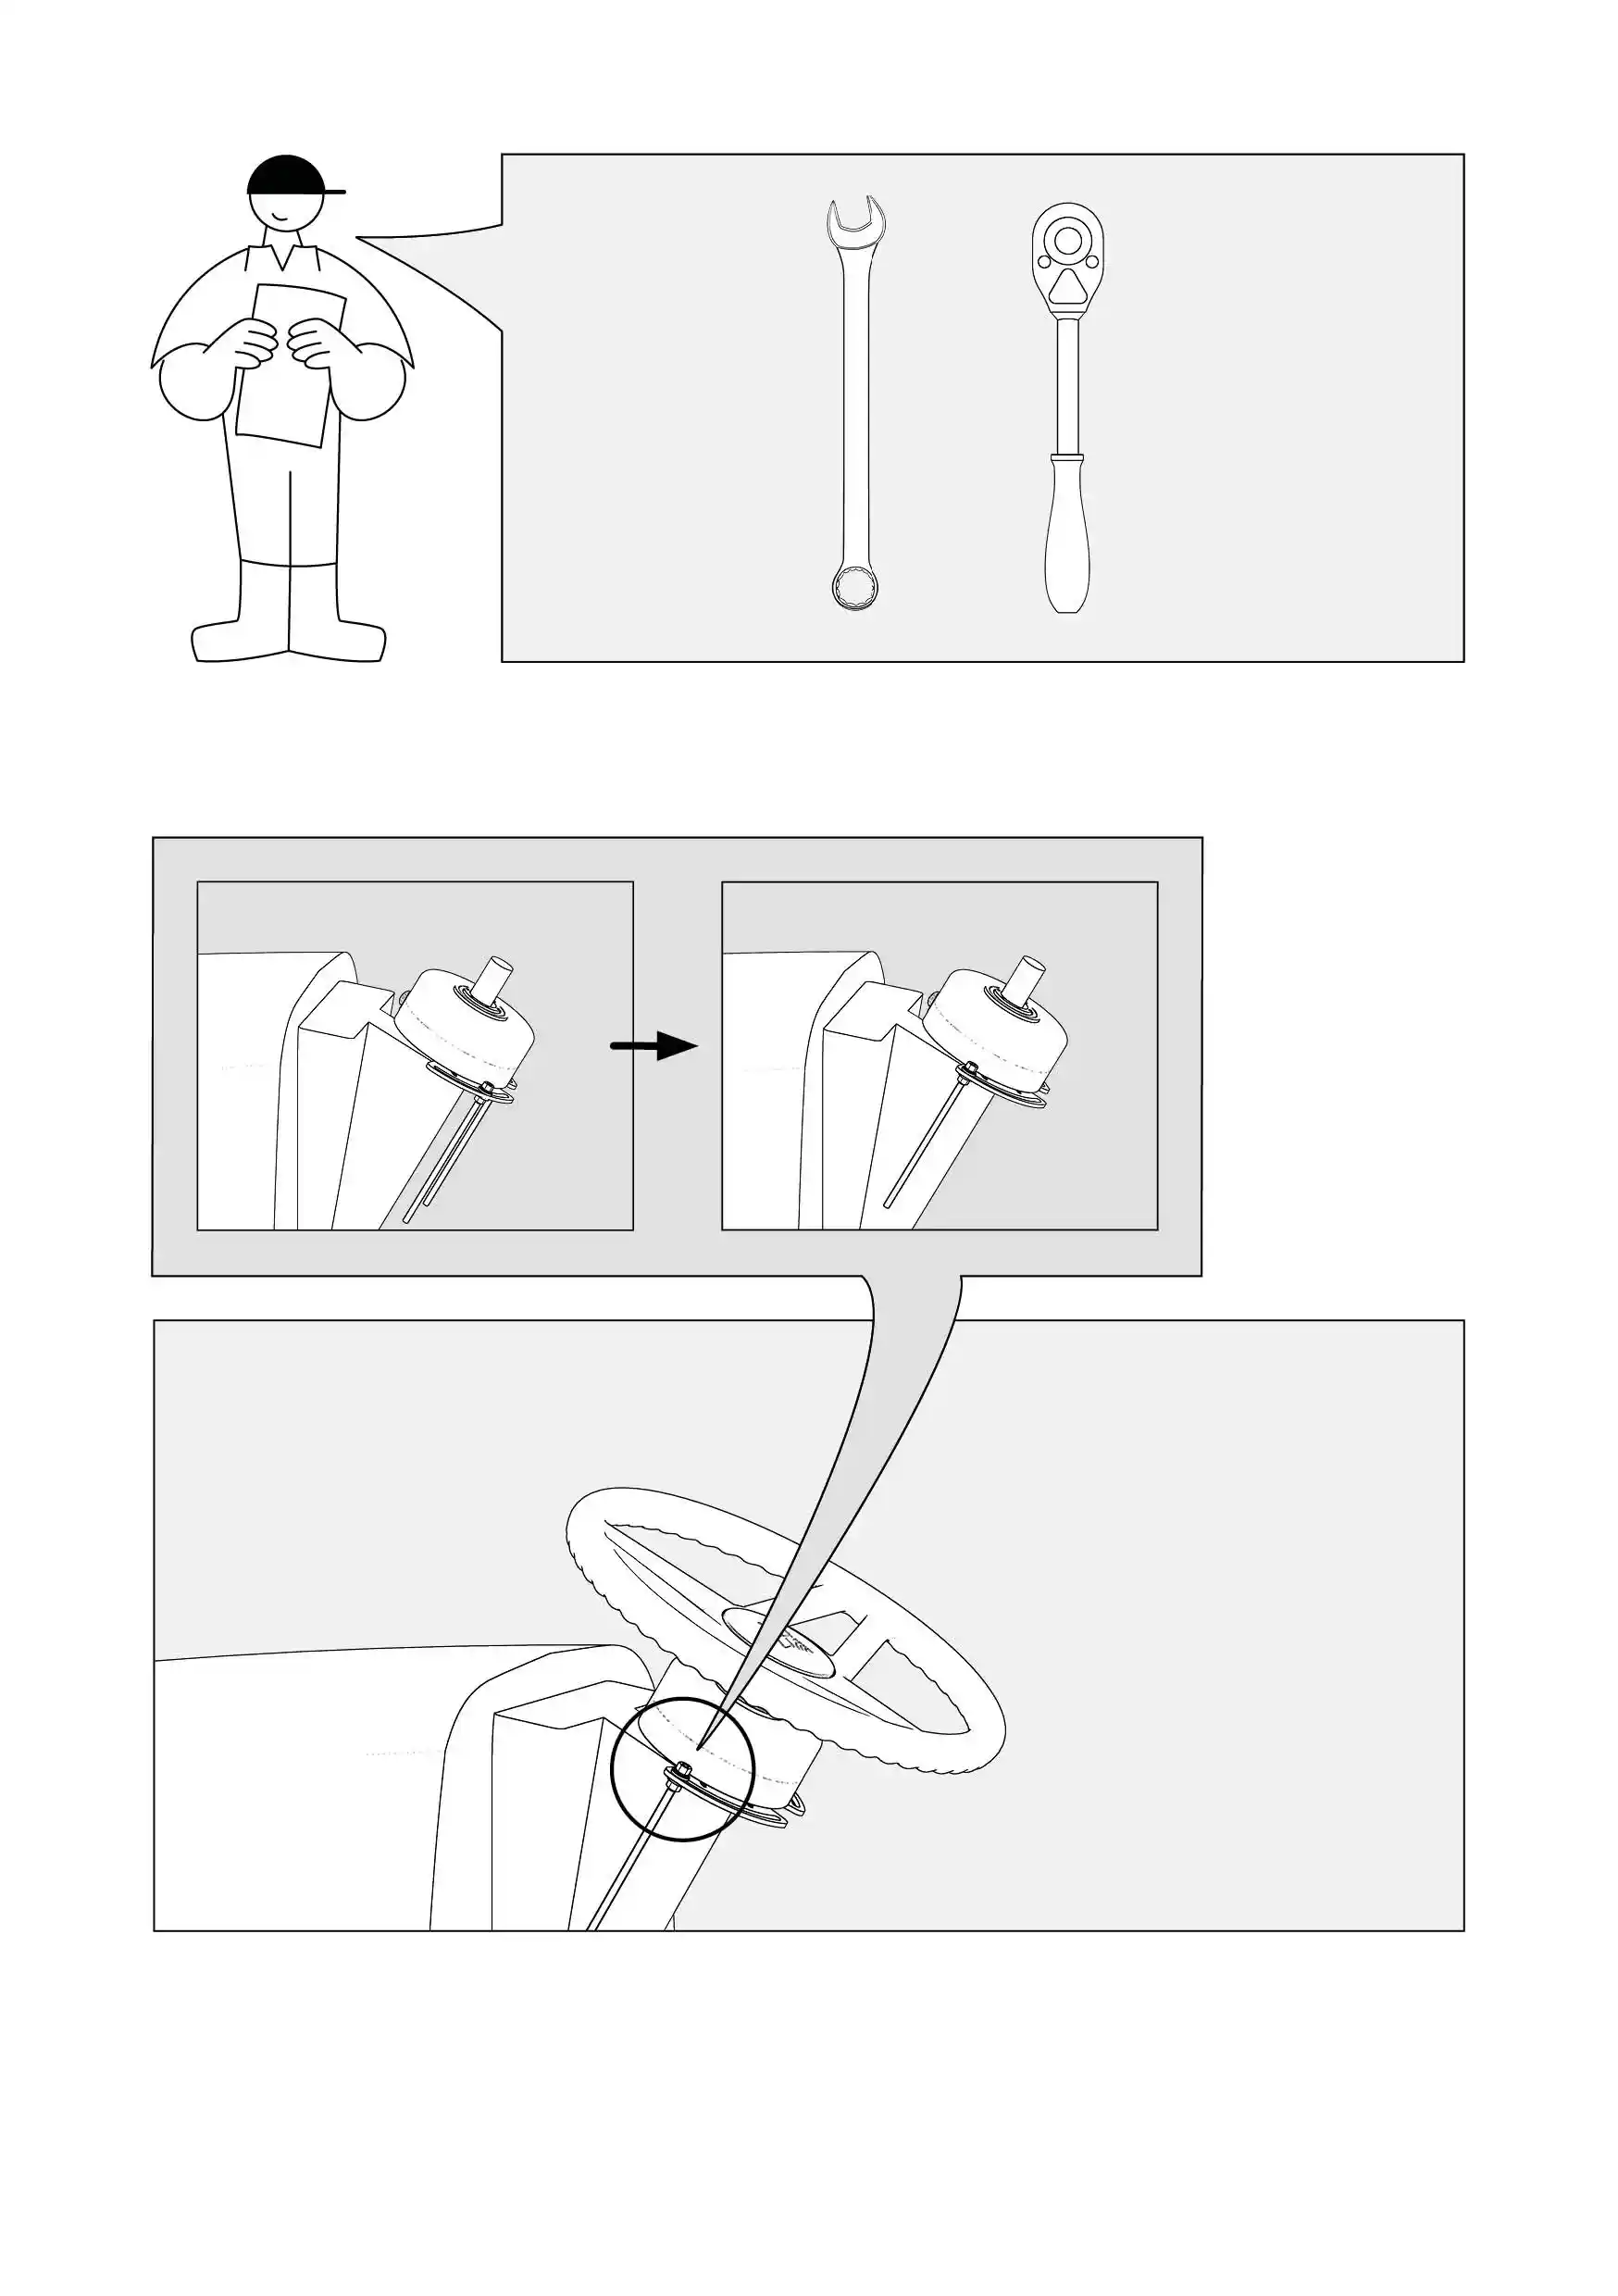
Fix the Anti-rotation bracket -03
---
Warning
It is very important that the motor is securely fixed to the steering dashboard.
---
How to do it?
- Use the open-end wrench size 13 to loosen the hex nut located on the metal pin above the metal plate.
- Push the metal pin to one end of the channel of the metal plate so that it firmly presses the steering dashboard.
- While pressing the metal pin to the steering dashboard, screw the hex nut firmly with the open-end wrench size 13.
- Repeat the above steps for the other metal pin.
- Shake the PowerWheel firmly to check whether it moves.
- If you can shake the PowerWheel, unscrew the hex nut with an open-end wrench size 13 and press the metal pin more firmly to the dashboard and then screw it again.
|
|
|
You can horizontally scroll the table on mobile.
|

No comments to display
No comments to display